Gecko Out Level 837 Solution Walkthrough | Gecko Out 837 Answer
How to solve Gecko Out level 837? Get step by step solution & cheat for Gecko Out level 837. Solve Gecko Out 837 easily with the answers & video walkthrough.

Gecko Out Level 837: Board Layout, Rules, and Win Condition
Starting Board and Gecko Configuration
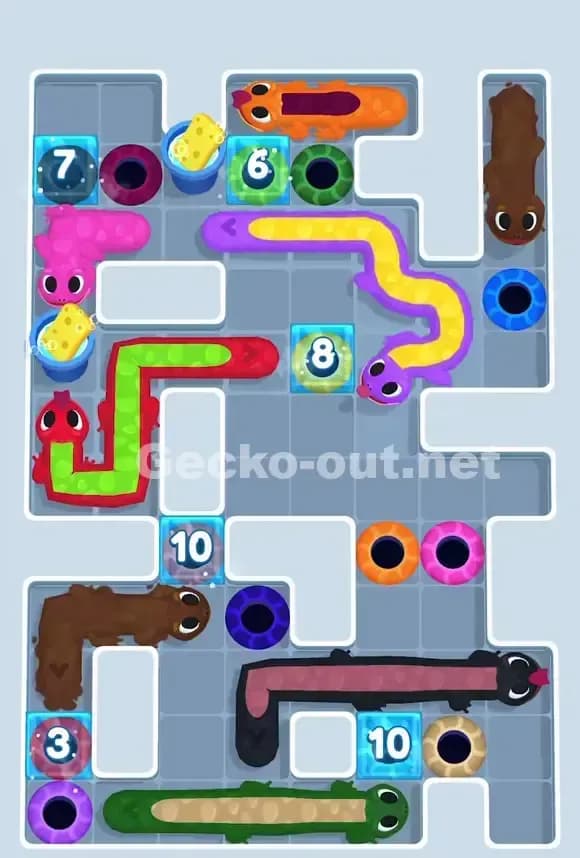
Gecko Out Level 837 is a densely packed puzzle with ten numbered geckos spread across a tight grid, and here's where it gets tricky: you've got geckos of every color imaginable, and they're tangled in a way that makes you wonder if there's even a solution. You're looking at colored holes scattered throughout the board, and every gecko needs to match its hole before time runs out. The board has two large open spaces (white void areas) that serve as critical safe zones, but the rest of the real estate is dominated by long gecko bodies and narrow corridors. The timer is aggressive—you're working against the clock from the moment you start—so every drag-path decision counts.
Win Condition and Movement Rules
You win Gecko Out Level 837 when all ten geckos have escaped through their matching-colored holes simultaneously. The catch? The body always follows the exact path your head traces, meaning if you drag the orange gecko's head through a tight S-curve, that entire body snakes through the same route with no shortcuts. Any collision—whether it's a wall, another gecko's body, or a frozen exit—stops the path dead. The timer is your constant pressure: if even one gecko is still on the board when it hits zero, you lose everything and restart.
Pathing Bottlenecks and Logical Traps in Gecko Out Level 837
The Central Corridor Choke Point
The biggest single bottleneck in Gecko Out Level 837 is the narrow vertical corridor running through the middle-right section of the board. Multiple long geckos need to pass through or near this area to reach their exits, and if you send one gecko through without planning ahead, you'll lock out the others. This is where most players get stuck: they move the orange gecko or the yellow one too early, and suddenly three other geckos have no legal path forward. I found myself restarting twice before I realized I needed to route the shorter geckos out first to keep that corridor clear.
Subtle Problem Spots
The first trap is the purple gecko linked to the magenta gecko (a "gang" pair) in the upper-left section. These two are physically connected, so you can't move one without dragging the other along. That means every path you draw has to account for both bodies, and it's easy to accidentally jam the purple one against a wall while trying to save the magenta. The second problem spot is the brown gecko on the left side: it's long, it's positioned awkwardly, and its hole is on the far right. You'll need to arc that head all the way across the board, and if you're not careful, the body will clip another gecko mid-drag. The third trap is timing the blue gecko at the bottom right—it's a short one, but it's positioned so that you can't exit it until you've cleared a specific corridor, and by then your timer is already low.
The Frustration and the Breakthrough
I'll be honest: Gecko Out Level 837 made me want to throw my controller. I kept trying to brute-force the long geckos out first, thinking speed was the answer. But the breakthrough came when I realized the puzzle isn't about moving fast—it's about moving smart. Once I accepted that I needed to clear the board in a specific sequence (short geckos first, then medium ones, then the long snakes), the solution fell into place. That moment when the path suddenly makes sense? That's what keeps you coming back.
Turn-by-Turn Path Strategy to Beat Gecko Out Level 837
Opening: Clear the Short Geckos and Create Escape Routes
Start with the short geckos—specifically the blue one in the top-right and the ones numbered 3 and 10 on the left side. These are your fast-track exits and they free up critical space. Drag the #3 gecko straight down and out through its purple hole; this takes maybe two seconds and opens up the left corridor. Next, handle the #10 gecko on the bottom left by routing it directly to its brown hole—no fancy paths, just a straight shot. These two moves alone buy you breathing room and prevent these short geckos from becoming obstacles later. Don't be tempted to tackle the long ones yet; you're playing defense right now, carving out safe zones.
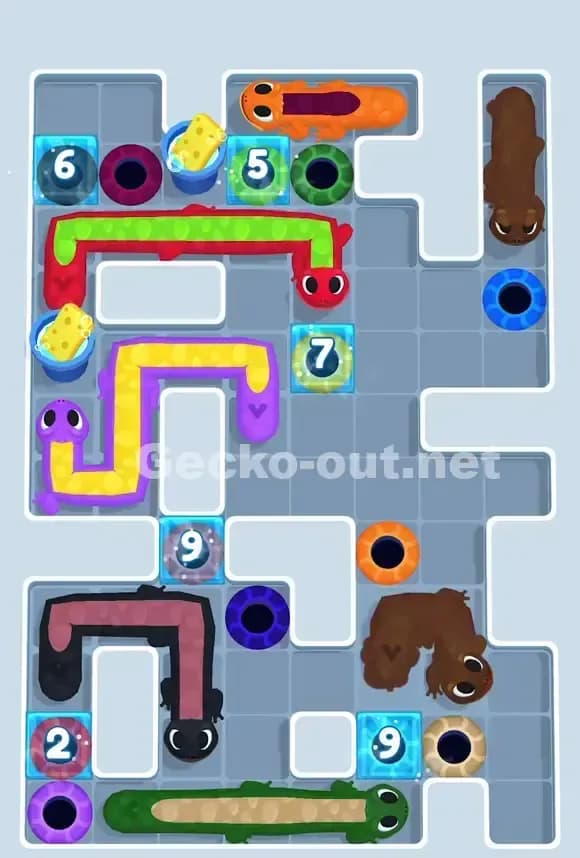
Mid-Game: Untangle the Gang Geckos and Reposition Long Bodies
Once the short geckos are gone, you can breathe a little. Now focus on the purple-magenta duo in the upper area. Since they're linked, drag them as a unit toward their respective holes, but plan the path so that you move them down and around, not directly forward. This avoids colliding with the orange gecko above. The yellow gecko in the upper-middle is next: drag its head right and down in a wide arc, using the open space near the bottom-right to give its long body room to snake through without hitting the blue gecko. Here's the key: you're not rushing these geckos into their holes; you're repositioning them into "safe parking" zones where they're out of the way but not yet exited.
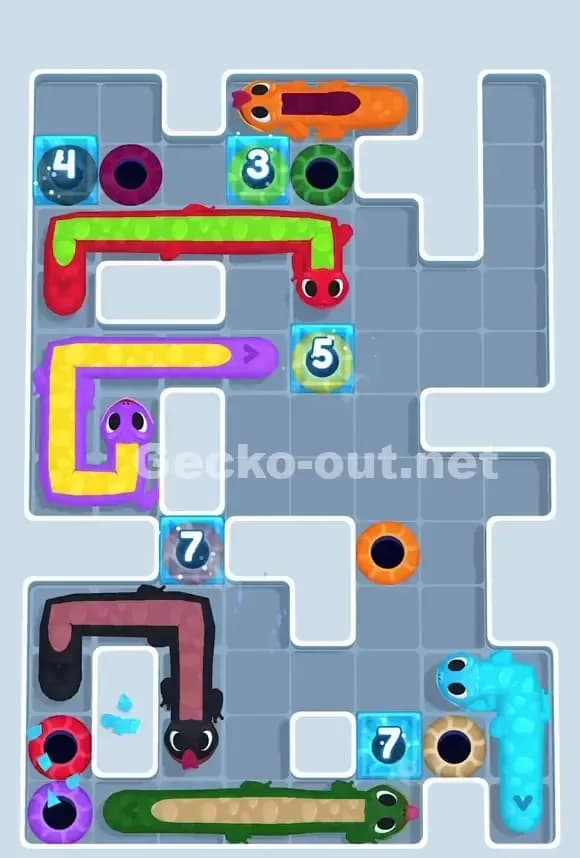
End-Game: Execute the Long Gecko Exodus with Precision Timing
In the final stretch, you've got three or four long geckos left (orange, yellow, the brown one on the left, and possibly the green one at the bottom). The exit order matters enormously. Start with whichever long gecko has the clearest path—usually the orange one at the top, since you can drag it down the right side into the blue hole without major obstacles. Then tackle the yellow snake by routing it through the central corridor (which should now be clear) toward its green hole. The brown gecko on the left is tricky: drag its head all the way right, letting its body follow a u-shaped path that hugs the perimeter. Finally, if you've got time, exit the green gecko at the bottom by dragging it left and up into the purple hole. If you're running low on time (say, 5–10 seconds left), pause and identify which gecko is closest to its hole, then execute that one and take your win. Perfection isn't always possible; a completed level beats a failed attempt every time.
Why This Path Order Works in Gecko Out Level 837
How Sequencing Prevents Knots
Gecko Out Level 837 teaches you the most valuable lesson in drag-path puzzles: the board untangles itself if you remove the short geckos first. Why? Because short geckos occupy less real estate, so removing them opens corridors and corners that longer geckos need. When you drag the #3 gecko out early, you're not just solving one problem—you're creating a safe lane for three other geckos to use later. The head-drag-and-body-follow mechanic means every gecko is essentially a rigid shape, so the puzzle is really about Tetris-like spatial planning. By exiting geckos in order of size and position, you're reducing the complexity of the board with each move.
Balancing Speed and Careful Planning
The timer in Gecko Out Level 837 is real, but it's not a sprint—it's a marathon with checkpoints. I've found that pausing for 3–5 seconds to trace a path mentally before you drag saves you 30 seconds of corrections later. When you're in the mid-game, slow down when you're handling gang geckos or repositioning long bodies near narrow corridors. But when you get to the end-game, speed up—you know which geckos are left and roughly where they need to go, so commit to the drags and trust your plan. The balance is: deliberate in the complex spots, fluid in the straightforward ones.
Booster Strategy for Gecko Out Level 837
You probably don't need a booster to clear Gecko Out Level 837, but an extra-time booster is worth using if you're down to 15 seconds and still have two geckos on the board—that's a practical moment to grab 30 extra seconds. A hint booster early on (first 20 seconds) is less useful here because you'll understand the puzzle once you've done two or three test runs. A hammer or power-move tool could help you bust through a frozen exit if the board includes one, but based on typical difficulty curves, that's not necessary at this level. Skip the boosters on your first two attempts; only deploy them if you're genuinely stuck.
Mistakes, Fixes, and Logic You Can Reuse in Other Gecko Out Levels
Five Critical Mistakes (and How to Avoid Them)
Mistake 1: Moving long geckos first. Players often assume the big, obvious geckos are the priority, but long geckos need space to move. The fix is simple: always exit the shortest geckos first. Mistake 2: Dragging paths directly instead of arcing around. A straight line seems efficient but often crashes into other bodies. The fix is to mentally trace a wider route—up-and-over or around-and-through—that gives the body space to follow. Mistake 3: Ignoring gang-gecko constraints. If two geckos are linked (visibly connected), you must move them as a single unit, or you fail. The fix is to identify linked pairs in the opening 10 seconds and plan dual routes. Mistake 4: Panic-exiting geckos late in the timer. When you've got 20 seconds left and four geckos still on the board, don't drag randomly; commit to the gecko with the shortest path and execute it cleanly. Mistake 5: Not using the open void spaces as turning zones. Those white empty areas are your friend; they give you room to arc long gecko bodies without hitting walls. The fix is to route geckos through open spaces whenever possible.
Reusing This Logic on Similar Levels
The sequencing strategy you learn from Gecko Out Level 837 (short first, then medium, then long) works on any level with mixed gecko sizes and tight board layouts. If you ever encounter a level with multiple gang-gecko pairs, apply the same principle: identify the pairs, plan their dual routes, and exit them as units before trying to maneuver unattached geckos. On frozen-exit levels (where some holes are ice-locked and require a hammer-style tool), use the opening steps to work out which gecko needs the booster, then save your resource for that moment. Whenever you see a narrow corridor or choke point, remember Gecko Out Level 837's central bottleneck lesson: always clear short geckos first to open that corridor.
Final Encouragement
Gecko Out Level 837 is genuinely tough, and there's no shame in restarting a few times. But it's also absolutely beatable with patience and a clear plan. Once you've cleared it once, you'll feel like a puzzle master, and every subsequent level will feel lighter. The strategies you're learning here—spatial planning, sequencing, using open space, managing gang geckos—are the core skills that make you unstoppable in Gecko Out's harder tiers. You've got this.

