Gecko Out Level 165 Solution Walkthrough | Gecko Out 165 Answer
How to solve Gecko Out level 165? Get step by step solution & cheat for Gecko Out level 165. Solve Gecko Out 165 easily with the answers & video walkthrough.


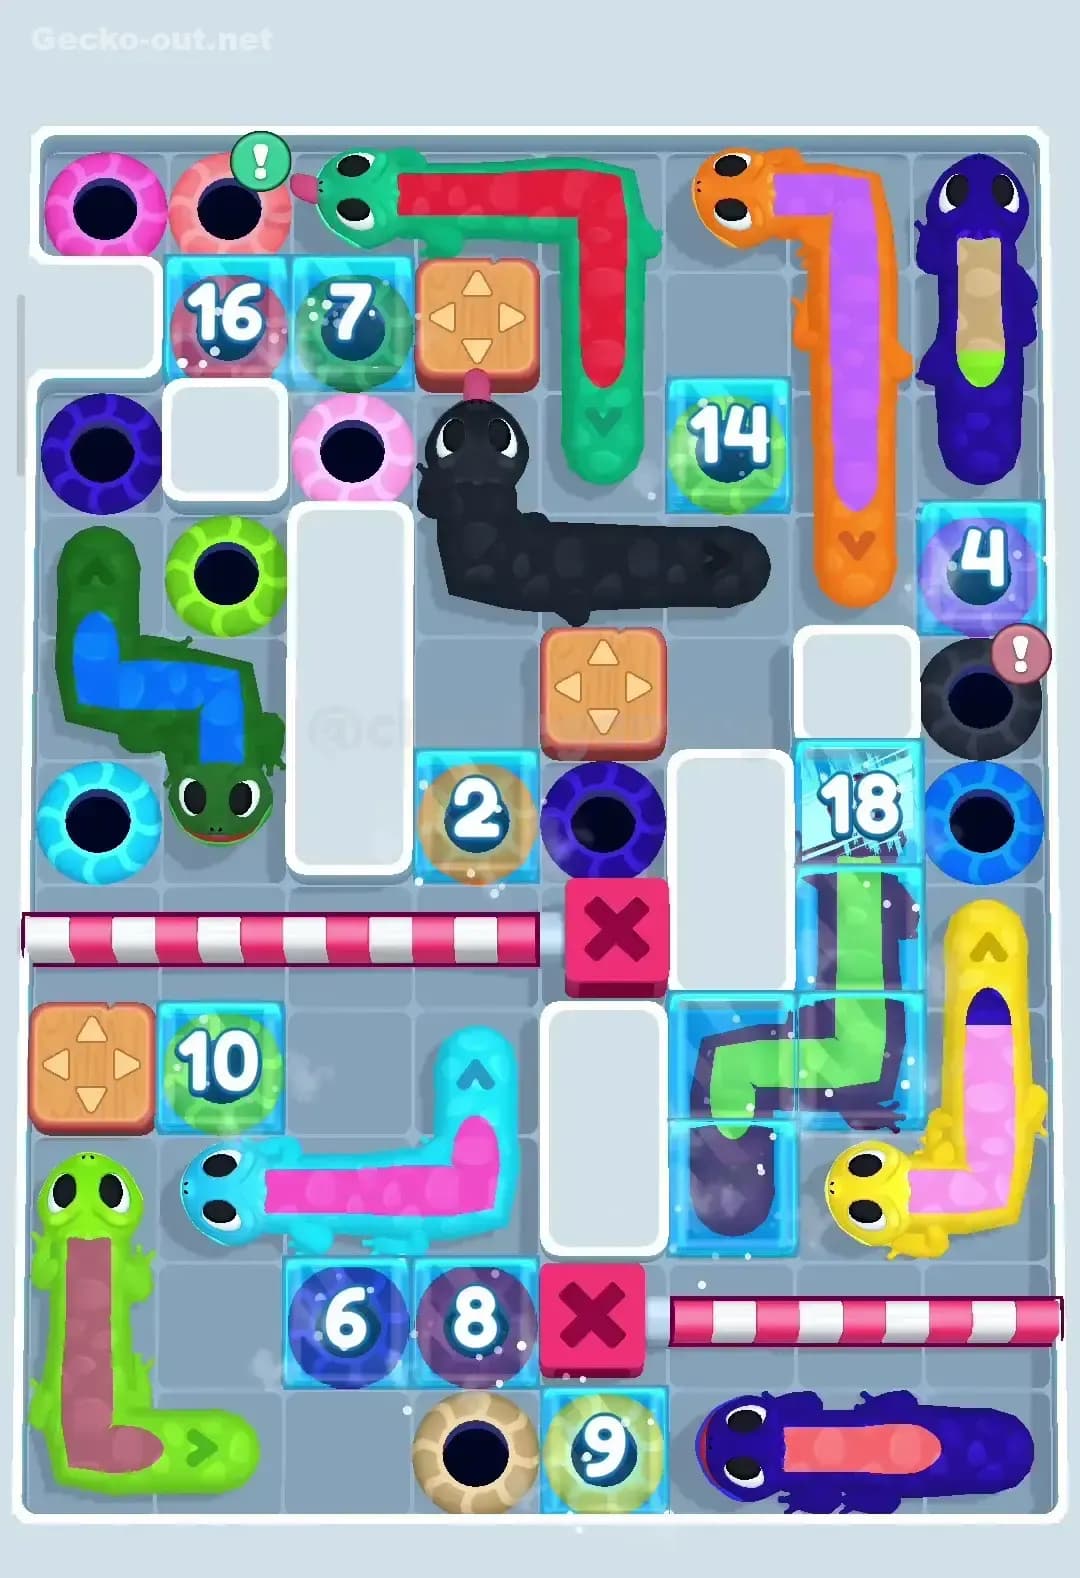
Gecko Out Level 165: Board Layout, Rules, and Win Condition
Starting layout and key obstacles
Gecko Out Level 165 throws you into a tall, narrow board that’s split into three “floors.” At the bottom you have a couple of long, fully active geckos (purple and blue-red) with their matching holes nearby, plus a thick row of stone blocks marked with a 5 that seal this lower floor off from the rest of the level. Above that, the middle floor holds a big green gecko, a dark purple gecko, and several colored holes crammed around a central corridor. At the top, most of the space is frozen: you can see iced-over gecko bodies, frozen exits, and countdown ice blocks labeled with numbers like 11, 5, 3, and 2.
The important detail in Gecko Out 165 is that a lot of the exits and geckos are locked behind those countdowns. The stone 5 blocks between the bottom and middle only clear after a few moves, and some geckos in the top corners can’t move until their ice thaws. You’re not really solving one board; you’re solving three small boards that gradually connect, and your early paths decide whether the late game is smooth or completely jammed.
Win condition, timer, and drag-path pressure
The win condition is the usual: guide every gecko to a hole of the same color, with no overlap on walls, other geckos, or still-frozen exits. In Gecko Out Level 165 the strict timer and the path-drag mechanic are the real enemies. Every curve you draw becomes permanent body space that other geckos cannot cross later, and those countdown blocks tick down while you’re drawing.
That means two things. First, your early moves on the bottom floor must be compact and efficient so you don’t clog the vertical lanes that will open when the 5 blocks disappear. Second, you can’t afford to redraw messy paths; you need to “see” the full route before you commit. If you treat every drag as final, you’ll have more than enough time to clear Gecko Out 165 without burning boosters.
Pathing Bottlenecks and Logical Traps in Gecko Out Level 165
The central corridor bottleneck
The single biggest bottleneck in Gecko Out Level 165 is the narrow vertical corridor in the middle of the board, just above the row of 5 blocks and below the rope-style gate and multi-colored exits. Almost every gecko, especially the long green one and the frozen top-floor geckos, has to pass through or around this area. If you let a long gecko snake across that corridor at the wrong time, you lock multiple colors out of their holes.
The trick is to treat that central strip as a highway: only one gecko may occupy it at a time, and whenever possible its body should hug one side (left or right) instead of zigzagging across both.
Subtle traps that waste space and time
There are a few sneaky traps that make Gecko Out 165 harder than it first looks:
- It’s tempting to draw big sweeping curves for the bottom geckos because there seems to be empty space. Those curves later block the vertical routes once the
5blocks vanish. - The dark purple gecko in the middle floor looks like it can sit anywhere, but parking it in front of the colored holes under the rope gate means the top-right frozen gecko has no straight exit.
- Some frozen exits near the top appear unusable, so it’s easy to forget which color belongs where. If you send, say, the central green gecko to a side hole that’s “obviously free,” you may accidentally steal the only sensible route for a top-floor gecko that thaws later.
These aren’t instant fails, but they create slow, suffocating positions where you run out of timer trying to route around your own earlier paths.
When the solution clicks
Personally, I bounced off Gecko Out Level 165 a few times. I kept freeing the central area, then realized my first gecko had drawn a huge spiral that cut the board in half. The moment it clicked was when I stopped thinking “how do I escape this one gecko right now?” and instead asked “which lanes must still be open ten moves from now?”
Once I forced myself to keep the bottom paths tight and straight, and saved the central corridor for later exits, the level suddenly felt fair. You’ll probably have the same experience: one attempt looks hopeless, then the layout of lanes and countdowns snaps into place and you see a clean exit order.
Turn-by-Turn Path Strategy to Beat Gecko Out Level 165
Opening: stabilise the bottom half
At the start of Gecko Out 165, focus purely on the bottom floor while the ice counters tick down.
- Send the long blue/red gecko to its matching hole with a straight, edge-hugging path along the bottom. Avoid climbing up toward the central stone
5row; keep its body on the lowest rows. - Next, route the purple gecko into its hole using the left side of the board. Again, keep the body tight to the wall so it doesn’t invade the middle columns.
- Don’t touch the central green gecko yet except to nudge it away from the vertical corridor if it’s already poking into it. You want it coiled in a corner, not stretched across potential lanes.
By the time those moves are done, the 5 blocks between the bottom and middle will usually be gone, or close to gone, giving you a clear sense of how the board will connect.
Mid-game: keep lanes open as the ice thaws
Once the bottom is mostly cleared, Gecko Out Level 165 becomes about preparation:
- Use the big green gecko to claim its exit in the middle floor. Drag its head in a compact U-shape, hugging one side of the central corridor and leaving at least one clean vertical lane unused.
- Move the dark purple gecko next. Park it either directly in its hole or in a side alcove that doesn’t block the colored exits below the rope gate. The rope gate area is prime real estate for the later top-floor geckos.
- As the upper ice blocks count down (11, 5, and 3), mentally trace each thawing gecko’s shortest straight-ish route to its matching hole. Make sure no existing body segments sit in those lanes. If they do, this is your last chance to reroute a gecko with a slightly different, still-compact path.
Your goal at the end of mid-game is simple: bottom geckos gone, middle geckos either out or parked neatly, and two clear “highways” ready for the top frozen geckos.
End-game: exit order and panic-proof finishes
When the top geckos and frozen exits finally unlock, Gecko Out Level 165 suddenly feels crowded again—but if your prep was good, the finish is straightforward.
- Free and exit whichever top-floor gecko has the straightest path to a nearby hole first (often the one in the smaller frozen cluster). Take the cleanest lane that doesn’t cross the central corridor more than once.
- Next, send the long top-right gecko down through the vertical corridor while it’s empty. Keep its body glued to the far right wall wherever possible so the center remains free.
- Leave any short, local gecko (like the one behind the “2” ice near the middle/bottom edge) for last. Its path is short and doesn’t need much planning, which is perfect when you’re low on time.
If the timer is flashing, commit to routes you already visualised instead of rethinking everything. A slightly suboptimal but simple path beats a perfect path you never finish drawing.
Why This Path Order Works in Gecko Out Level 165
Using body-follow pathing to untie the knot
The whole plan for Gecko Out Level 165 is built around the body-follow rule. By clearing the low, self-contained geckos first with tight, edge-hugging routes, you “reserve” the flexible central columns for late-game traffic. Each later gecko then threads through pre-existing bodies instead of being forced to wrap around them.
You’re basically pulling strands out of a knot in the right order: short ends first, then the big loops, and finally the long top strand that needs the most room.
Balancing planning time against the clock
The timer in Gecko Out 165 is strict, but not cruel. The key is how you use your first 5–10 seconds. I’d recommend spending a moment before moving:
- Note which exits are currently frozen.
- Identify two safe vertical lanes you want to keep clear for late-game.
- Decide which bottom gecko will leave first.
After that little pause, you should move quickly and confidently. Constantly stopping mid-drag to reconsider is what actually burns the clock.
Boosters: nice to have, not required
You can beat Gecko Out Level 165 without any boosters. However, if you’re stuck:
- A scissor/hammer-style tool is best used to clear a single blocking body segment in the central corridor late in the level, not to brute-force the opening.
- Extra time is only worth spending once you already understand the route and just need a few more seconds to execute it cleanly.
If you feel like you’d need multiple boosters to pass, that’s usually a sign you’re drawing too many wide, curvy paths early.
Mistakes, Fixes, and Logic You Can Reuse in Other Gecko Out Levels
Common mistakes on Gecko Out Level 165 and how to fix them
- Drawing huge spirals for early geckos. Fix: hug walls and corners; never cross the central corridor more than necessary.
- Parking the middle-floor purple gecko in front of the multi-colored exits. Fix: either exit it immediately or tuck it into a side pocket.
- Ignoring frozen exits and sending a mid-floor gecko to the “wrong” yet convenient hole. Fix: scan all holes first, including iced ones, and mentally assign each color.
- Rushing the top-right long gecko into the corridor while another body is already there. Fix: always clear the corridor before dragging that last long one through.
- Restarting too late. Fix: if you realise you’ve blocked both main lanes, restart quickly instead of trying to salvage a doomed layout.
Reusing this logic on knot-heavy and frozen-exit stages
The habits you build on Gecko Out Level 165 carry over to many other Gecko Out levels:
- Clear isolated, bottom-floor geckos first with minimal path length.
- Reserve central highways for the longest geckos or those that thaw late.
- Always pre-assign exits when there are frozen holes or countdown gates.
- Treat countdown blocks as a planning window, not dead time; use those moves to pre-position geckos and visualise routes.
Any time you see a mix of gang geckos, ice, and narrow lanes, think “Which lanes must still be free in the final 5 seconds?” and work backward.
Yes, Gecko Out 165 is absolutely beatable
Gecko Out Level 165 looks chaotic: frozen clusters everywhere, countdowns ticking, and a timer breathing down your neck. But once you respect the central corridor, keep the early paths compact, and follow a simple exit order—bottom first, middle next, top last—the level becomes a clean logic puzzle instead of a panic-fest.
Stick to the lane-management ideas here, restart quickly when you spot an early mistake, and you’ll see Gecko Out 165 go from “impossible tangle” to “oh, that’s actually elegant.” You’ve got this.