Gecko Out Level 353 Solution Walkthrough | Gecko Out 353 Answer
How to solve Gecko Out level 353? Get step by step solution & cheat for Gecko Out level 353. Solve Gecko Out 353 easily with the answers & video walkthrough.
Gecko Out Level 353: Board Layout, Rules, and Win Condition
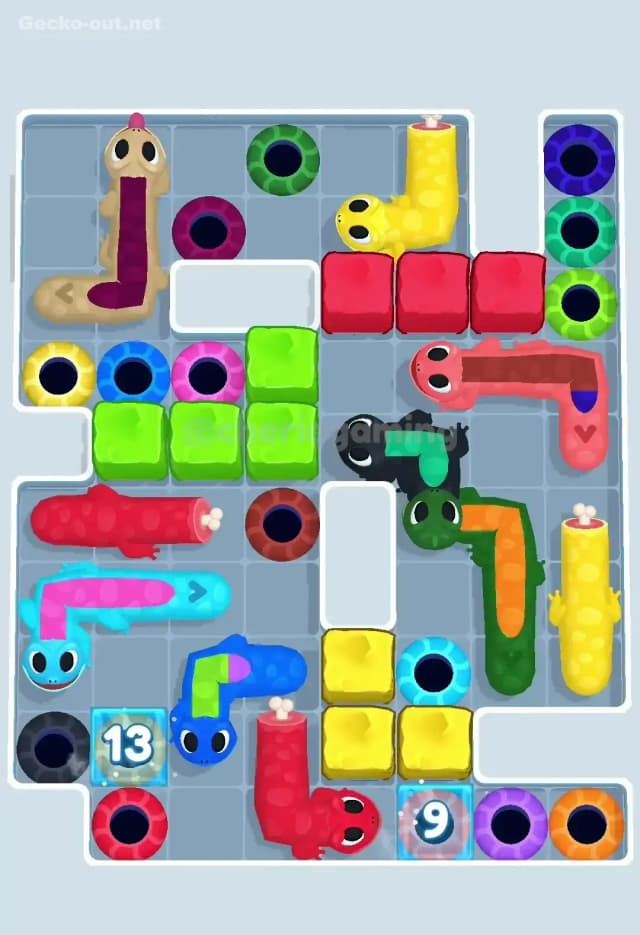
Starting Board: Colors, Knots, and Obstacles
Gecko Out Level 353 throws you straight into a crowded grid. You’ve got a mix of long and short geckos: beige, yellow, red, green, blue, cyan, and a small black one with a teal segment. Several exits ring the outer edge of the board, each colored to match one of these geckos. The exits are close, but the bodies are knotted so tightly that almost none of them can reach their holes without a serious reshuffle.
In the upper half, the beige and yellow geckos are wedged around a block of red cubes and a cluster of green cubes. These cubes act like solid obstacles; you can’t slide through them, so they define a narrow path down the middle of the board. The middle area is packed with a pink‑red gecko, the short black one, and the long green‑orange gecko that runs vertically on the right. At the bottom, a horizontal red gecko, a cyan gecko, and a small blue gecko curl around two icy tiles showing numbers (13 and 9). Those icy tiles are your time boosts, but you still need clean paths to break them.
The key shapes you should notice on Gecko Out 353 are: the long green gecko along the right wall, the horizontal red gecko on the left, and the block of yellow cubes near the bottom‑right exits. Together, they create a series of tight choke points. Once you “see” where those choke points are, the board starts to make sense and you can plan how to unwind it without trapping yourself.
Win Condition and How Timer + Pathing Change the Puzzle
The win condition in Gecko Out Level 353 is straightforward: every gecko must slither into its matching colored hole before the level timer hits zero. The twist is how you move them. You drag the head to draw a path, and the body follows that exact trail cell by cell. You can’t cross walls, you can’t pass through other geckos, and you can’t use exits that are blocked by ice or bodies. If you get greedy and draw a fancy loop, the body will faithfully trace it and probably jam something important.
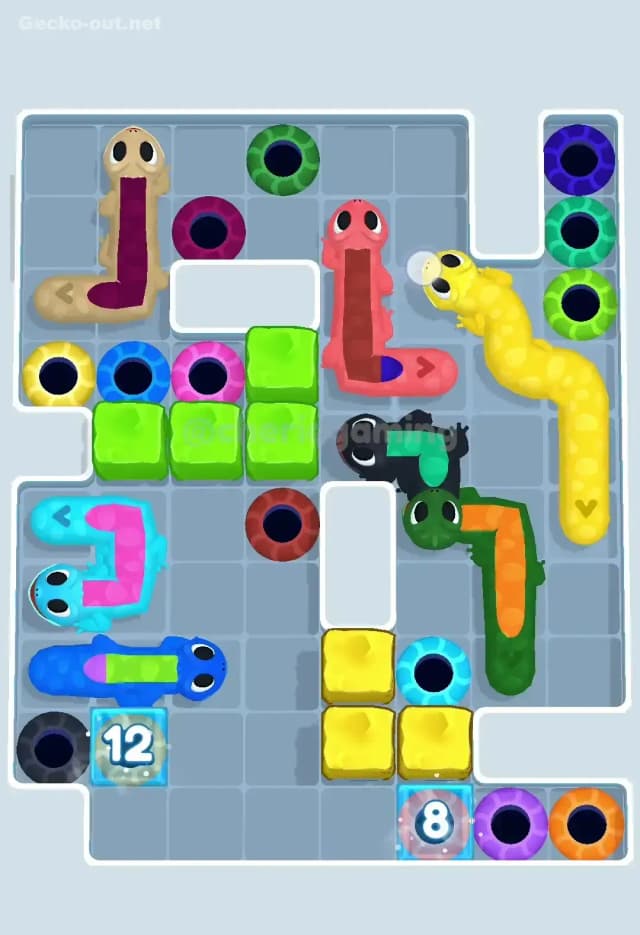
That’s why Gecko Out 353 feels tight: you’re not just finding a route, you’re choosing the simplest, least blocking path each time. The level’s real difficulty comes from the combination of a strict timer and these path‑tracing rules. You don’t have time to experiment with ten different squiggly lines. You need to visualize where the tail will end up after each move and keep the central corridors open for future geckos. The time tiles (13 and 9) give you breathing room, but if you waste that extra time on bad paths, you’ll still run out on the last couple of geckos.
Pathing Bottlenecks and Logical Traps in Gecko Out Level 353
The Main Bottleneck: Right-Side Stack and Central Corridor
The single biggest bottleneck in Gecko Out Level 353 is the right side of the board. The long green‑orange gecko sits vertically against the right wall, and a yellow vertical gecko plus the yellow cube block are just below it. Together they gatekeep the bottom‑right exits and the central vertical corridor. If you move them in the wrong order, you’ll block off half the board and force a restart.
Everything else has to weave around this stack. The green gecko’s body is long enough that if you drag its head in a sloppy S‑shape, it will sprawl across the middle and cut off paths for the black, red, and blue geckos. You want that green gecko hugging the outer wall and exiting relatively late, so it acts like a moving border rather than a giant plug in the middle of the map.
Subtle Problem Spots That Sneak Up on You
A couple of subtler traps in Gecko Out 353 only show themselves after a few failed attempts:
-
The horizontal red gecko in the lower left looks easy to clear, but if you send it out first with a wide arc, its tail ends up sitting across the bottom corridor while others still need to pass. You might get its red exit done, but you’ll lose access to the ice 13 tile or bottom exits. Use short, efficient paths and don’t rush it out before you’ve opened space.
-
The small blue gecko near the bottom center is a classic “looks harmless, actually deadly” piece. If you park it in the wrong corner while working on the cyan or red geckos, it blocks the center of the bottom lane and keeps you from rotating bodies around. Always park it hugged tight to a wall, not floating in the middle.
-
The black gecko in the mid‑right section loves to sit right where you want to turn other geckos. If you leave it until late, you’ll constantly have to draw awkward detours around it, wasting both time and space. It’s short, so clear or park it early in a side pocket so it stops being in the way.
When the Solution Starts to Click
When I first played Gecko Out 353, it felt like every move just tightened the knot. I’d free one gecko and immediately block an exit for another. The turning point was when I stopped chasing the “easiest” gecko and started thinking about lanes: top lane, middle lane, bottom lane, plus the right‑side shaft. Once you treat each lane as shared infrastructure rather than personal space for a single gecko, the puzzle opens up.
The “aha” moment came when I realized the long green gecko needs to act like a sliding door, not a battering ram. You keep it flush to the right wall, open the central area using shorter geckos, then swing green out only when everyone else has a clear shot. After that, the level stops feeling like chaos and starts feeling like a timed checklist.
Turn-by-Turn Path Strategy to Beat Gecko Out Level 353
Opening: Clearing Space and Hitting the First Time Tile
In Gecko Out Level 353, your opening goal is simple: create working room in the bottom half and grab the ice 13 tile early.
-
Start with the cyan and small blue geckos at the bottom. Draw short, tidy paths that nudge them away from the center and toward their exits or safe parking spots along the left and bottom edges. While doing this, make sure one of them passes over the 13 tile so you lock in that time bonus.
-
Next, reposition the horizontal red gecko in the lower left. Don’t send it home yet; instead, slide it so it hugs the left wall and leaves the bottom lane open. Think of this as parking the red gecko parallel to the wall.
-
Use the space you’ve just created to adjust the small black gecko in the middle. Park it against a side wall or near an already-cleared exit so it’s no longer blocking the central corridor. This makes the board feel instantly less cramped.
Mid-Game: Protecting Lanes and Managing Long Bodies
The mid‑game of Gecko Out 353 is where you decide if you win or burn all your extra time. Focus on controlling the middle and right lanes.
-
With the bottom more open, work on the green‑orange gecko along the right side. Drag its head in a smooth, minimal curve that keeps its body hugging the right wall. You’re not exiting yet—just sliding it down or up so other geckos can cut across the middle without being pinched.
-
Clear one of the short upper geckos—usually the beige or yellow near the top—by drawing a straight path to its matching hole. Use tiny detours only when necessary to avoid blocking exits you still need. When you exit one of these, you free up top‑lane tiles that help with later rotations.
-
Keep the green cube and yellow cube blocks in mind as fixed borders. Route other geckos around them in gentle L‑shapes, not spirals. Your rule of thumb: if a path crosses the center of the board more than once, it’s probably overcomplicated and will cause trouble later.
-
Aim to break the 9‑second ice tile during this phase as you move a gecko past the bottom‑right area. You’ll want that buffer for the final exits when every drag counts.
End-Game: Final Exit Order and Dealing with Low Time
The end‑game of Gecko Out Level 353 is all about discipline. You’ll usually have the long green gecko, at least one red, and one of the yellows still in play.
-
Exit any remaining small geckos first, especially the black and blue ones if you somehow haven’t already. Their tiny bodies can thread through openings without messing up lane structure.
-
Next, send out the horizontal red gecko you parked earlier. By now, you should be able to draw an almost straight line along the bottom to its red exit, leaving the middle untouched.
-
Then handle the green‑orange gecko along the right wall. Draw a clean, mostly straight path from its current position to its green exit, keeping it glued to the edge whenever possible. Because you’ve already cleared most of the others, it won’t choke the board as it moves.
-
Finish with the last yellow or beige gecko in the upper zone. Their exits are usually near the top or right edge, and by this point you just need one final, efficient line. If the timer’s flashing, don’t stop to over‑optimize—just run the shortest safe route that doesn’t cross anyone else’s exit.
If you’re low on time and still have two long geckos left, prioritize whichever one sits across the most paths (usually the green). Clearing that one buys you more usable space than clearing a less intrusive gecko.
Why This Path Order Works in Gecko Out Level 353
Using Head-Drag Pathing to Untangle Instead of Tighten
The whole plan for Gecko Out 353 relies on the body‑follows‑head rule. By starting with the short geckos at the bottom, you carve out space without leaving long, winding trails behind. Parking geckos snug against walls keeps their bodies from cutting across shared corridors. When you finally move the long green gecko, you already know exactly where its body will lie: along the right wall, not slicing the grid into two isolated halves.
Avoiding complex loops is critical. Every extra corner you draw is a potential future choke point where another gecko will get stuck. The suggested path order minimizes crossings and keeps the middle lane and right shaft open for as long as possible, so each new path reuses previous lanes instead of fighting them.
Timer Management: When to Think and When to Commit
On Gecko Out Level 353, you should spend the first few seconds just reading the board: identify exits, spot the two time tiles, and mentally mark your three main lanes. During this planning moment, don’t move anything yet; just decide which gecko you’ll move first and where you’ll park it.
Once you’ve committed to the plan, speed matters. Draw simple, “rectangular” paths with as few turns as possible. If you catch yourself hesitating in the mid‑game, pause briefly, zoom out mentally, and ask: “Am I about to block a lane?” That one‑second check is worth it. But once you confirm a path is safe, drag decisively—slow, wobbly lines waste both time and space.
Boosters: Optional Help, Not Required
Boosters in Gecko Out 353 are nice but not mandatory. If you’re really stuck, an extra‑time booster right at the start or before the end‑game can give you room to think, but you don’t need it if you grab both the 13 and 9 tiles along the way. Hammer‑style blockers or instant‑hint tools aren’t essential here either; the layout is tight but fair once you respect the lane logic. I’d save heavy boosters for levels with more randomness or frozen exits you absolutely can’t work around.
Mistakes, Fixes, and Logic You Can Reuse in Other Gecko Out Levels
Common Mistakes on Gecko Out 353 and How to Fix Them
-
Moving the long green gecko first and sprawling it across the middle. Fix: keep it against the right wall and delay its exit until late, using it as a controlled border instead of a random snake.
-
Rushing the horizontal red gecko out early. Fix: park it neatly along the left wall during the opening, then clear it late when the bottom lane is free.
-
Ignoring the time tiles until it’s too late. Fix: plan to hit the 13 tile in the opening and the 9 tile in mid‑game while you’re already moving geckos through those zones. Don’t take long detours just for them; make them part of efficient paths.
-
Parking small geckos in the center. Fix: every time you reposition a short gecko, mentally ask “Is this tile a crossroads?” If yes, that’s the worst parking spot. Pin them to edges or into already‑cleared exit corners.
-
Drawing fancy, wavy paths. Fix: challenge yourself to use the minimum turns needed. The simpler the path, the less likely you’ll accidentally cut off a lane.
Reusing This Logic on Other Knot-Heavy Levels
The strategy that beats Gecko Out Level 353 translates really well to other tough Gecko Out stages. Any time you see a level full of gang geckos, frozen exits, or long bodies wrapped around each other, think in terms of lanes and parking, not individual geckos. Clear compact geckos first to create space, use long ones as movable walls, and always keep shared corridors open as long as possible.
On frozen‑exit stages, you can treat the thaw timers like the 13 and 9 tiles here: schedule passing over them as part of efficient routes instead of chasing them separately. On gang‑gecko levels with color blocks, treat those blocks as permanent walls, then apply the same idea of hugging edges and avoiding spiral paths.
Final Thoughts: Tough but Completely Beatable
Gecko Out Level 353 feels brutal at first glance, but once you approach it with a clear lane‑based plan, it becomes a satisfying, almost mechanical solve. You’re not relying on lucky guesses—you’re executing a sequence: open the bottom, park short geckos smartly, manage the right‑side stack, then clean up with the long ones. Stick to simple, straight paths, respect the bottlenecks, and use those time tiles wisely. With that mindset, Gecko Out 353 stops being a wall and becomes one of those levels you’ll look back on and think, “Wow, that was tight, but I owned it.”

