Gecko Out Level 485 Solution Walkthrough | Gecko Out 485 Answer
How to solve Gecko Out level 485? Get step by step solution & cheat for Gecko Out level 485. Solve Gecko Out 485 easily with the answers & video walkthrough.


Gecko Out Level 485: Board Layout, Rules, and Win Condition
What The Board Looks Like
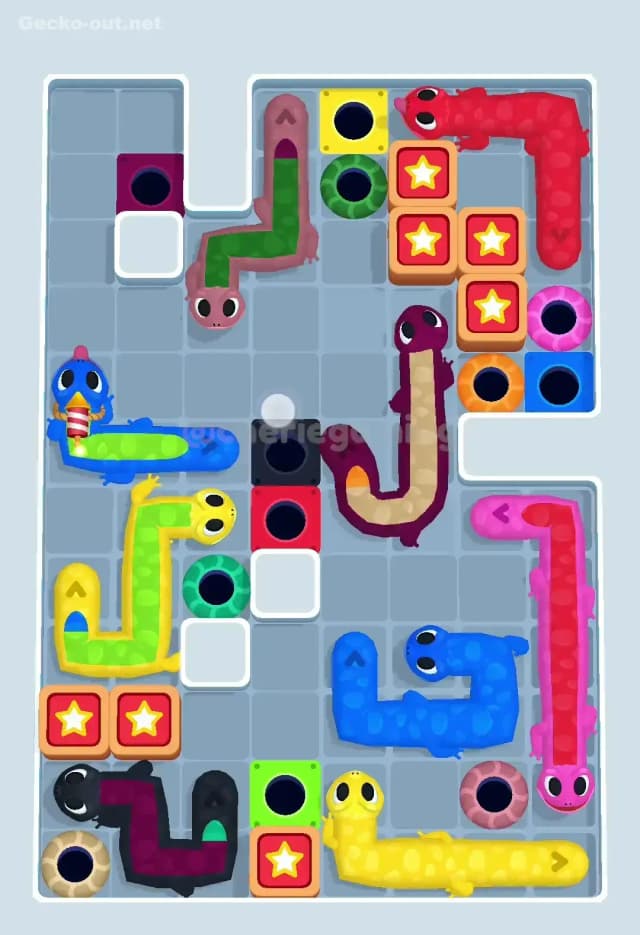
In Gecko Out Level 485 you’re dealing with a packed, almost wall‑to‑wall tangle of geckos. There are nine geckos total, and every color has a matching donut‑shaped hole somewhere on the grid: blue in the top‑left area, red in the top‑right, a tall brown gecko running through the middle, a light pink gecko tucked to the right of it, a bright yellow gecko in the lower‑left half, a beige/burgundy gecko in the center bottom, a lime‑green/red gecko on the right, a black gecko in the bottom‑left and a long purple gecko stretched along the bottom‑right.
The level is cut into two zones by a red‑and‑white horizontal gate near the bottom. Above the gate you see most of the exits and a tight maze of walls and holes; below the gate you have the black and purple geckos plus a couple of exits and star blocks. Several squares are blocked with star‑marked toll blocks and there’s a red X block sitting near the gate that makes the lower crossing even narrower. Some holes sit on colored tiles that don’t match their rims, which makes them look tempting but wrong for many geckos.
Rules And Why This Level Feels So Tight
As always in Gecko Out 485, your job is simple on paper: drag each gecko’s head so its body slithers along the exact path you drew, and end with every gecko in a hole of the same color before the timer runs out. Geckos can’t overlap each other, can’t cut through walls, and can’t slip into the wrong hole, even if it’s just one square off. Every twist of your path matters, because the body will copy it perfectly and might block a corridor you were planning to use later.
The timer is strict enough that you don’t get to experiment wildly. If you redraw the same gecko three or four times, you’ll almost certainly time out. Gecko Out Level 485 is all about planning a clean route order: you open the critical lanes once, use them efficiently, and avoid any “pretty but useless” loops that waste both time and space.
Pathing Bottlenecks and Logical Traps in Gecko Out Level 485
The Main Bottleneck: Gate And Star Toll
The single biggest bottleneck in Gecko Out Level 485 is the red‑and‑white horizontal gate close to the bottom. Until you unlock it by running geckos over all the star blocks, the geckos living below the gate (especially the black and long purple ones) are locked away from most of their exits. At the same time, the star blocks themselves are placed in awkward spots: three next to the red gecko in the top‑right, two above the gate on the left, and one just above the purple gecko on the right.
Because the corridors around those stars are only one square wide, the gecko you use to hit them can easily become a permanent wall. If you rush the star collection with the wrong gecko, you’ll unlock the gate but trap half the board behind your own body. So the whole level really revolves around threading those stars in the right order without leaving a snake of scales across the main lanes.
Subtle Traps You’ll Probably Hit First
First subtle trap: the tall brown middle gecko. Its body runs vertically through the central column, and if you drag it sideways for “just a moment,” you’ll block the left exits for yellow and blue while also blocking the approach to a couple of holes on the right. It looks like a handy tool to hit stars, but using it early usually makes the knot tighter.
Second trap: the light pink gecko to the right of the brown one. It’s sitting in a cramped alcove with exits and star blocks just beyond it. If you draw a fat zigzag path for it, the pink body will seal off the right‑hand corridor that the green/red gecko and the long purple gecko both need later.
Third trap: the black gecko in the bottom‑left. It’s right next to a tan hole, and it’s very tempting to score an easy early exit. But if you yank it into the hole before the gate opens, its body can end in positions that make re‑routing the yellow or beige/burgundy gecko painful. A “free” early win can actually cost you the level.
When The Level Finally Clicks
I’ll be honest: Gecko Out 485 feels rude the first few attempts. You’ll clear a couple of geckos, feel good, then realize that your red gecko is blocking the last star, or your pink gecko has become a permanent wall on the right. For me, the moment it started making sense was when I stopped thinking “How do I exit this gecko?” and started thinking “Where can I park this body so others can pass?”
Once you see the board as a sequence of temporary parking spots instead of just exits, Gecko Out Level 485 goes from chaos to a logic puzzle. You use geckos as moving walls to open and close lanes, and you collect stars with whichever gecko can slip through without dooming the rest.
Turn-by-Turn Path Strategy to Beat Gecko Out Level 485
Opening: Clear Space In The Top Half
- Start with the blue gecko in the top‑left. Draw a short, tight path down into its blue hole in the nearby cluster, hugging the left wall so its body doesn’t sprawl across the central area. This immediately frees vertical space for the tall brown gecko.
- Next, move the tall brown gecko. Slide its head straight toward its matching exit in the central upper area with the smallest possible curve; avoid dragging it horizontally across the board. You want its final body to run mostly vertical, leaving the lanes on both sides open.
- Now work the light pink gecko on the right. Draw an L‑shaped path that nudges it out of the middle and parks most of its body against the right wall without yet exiting, leaving the corridor just inside it clear. This “parked” pink gecko later helps guide others while staying out of the way.
Mid‑Game: Unlock The Gate And Protect The Lanes
- With space opened, turn to the red gecko in the top‑right. Use it to run over the three star blocks stacked near its body. Drag a neat Z‑shaped path that taps all three stars while ending with the red body tucked into the upper‑right corner, not lying across the mid‑right corridor. Exit it only after the stars are hit and the path is tidy.
- Use the light pink or green/red gecko to hit the lone star block just above the long purple gecko on the right side. Again, keep the path hugging walls instead of running through the center.
- Hit the remaining star blocks above the gate on the left using the yellow gecko. Guide yellow up, across the two stars, then park it along the left edge so its body forms an outer border rather than a central wall. When the last star is triggered, the horizontal gate opens and the bottom section connects to the rest.
- As soon as the gate opens, quickly slide the black gecko from the bottom‑left into its matching tan hole, using a direct path that doesn’t snake across the new opening. Then nudge the beige/burgundy gecko into a vertical parking position in the middle, giving the long purple gecko room to swing out.
End‑Game: Clean Exits, No Late Choke Points
- Free the long purple gecko next. Drag its head up through the gap where the gate used to be, brush past the now‑cleared star block, and arc it into its purple exit on the right side. Keep its path smooth and mostly along the outer perimeter so you don’t bisect the board.
- Use the green/red gecko to slip through any remaining central lanes, heading for the green exit without cutting through other bodies. At this stage you should only have two or three geckos left, so focus on straight, minimal paths.
- Finish by exiting whichever remains: usually the lightly parked light pink and the beige/burgundy gecko in the center. Because everyone else is gone, you can draw slightly wider paths if needed without risking permanent blockages. If the timer is low, prioritize the gecko whose exit requires more turns first and then dump the easiest one last.
Why This Path Order Works in Gecko Out Level 485
Using Head‑Drag Pathing To Untangle Instead Of Knotting
The plan for Gecko Out 485 always keeps one idea in front: every extra bend becomes a wall segment. By sending the blue and brown geckos out with straight, compact lines, you remove two huge bodies from the densest part of the map early. Parking the pink and yellow geckos against the edges turns them into harmless borders rather than central obstacles.
When you collect stars with geckos that can cling to the edges, you avoid drawing “barred doors” across the main corridors. That makes the gate opening a good thing instead of a trap. By the time you let the bottom geckos out, the top half is mostly empty, so their long bodies have space to weave through without tightening the knot again.
Working With The Timer, Not Against It
For Gecko Out Level 485, I like to treat the first few seconds as “planning time.” Before moving anything, mentally mark: which stars each gecko will hit, where you’ll park yellow and pink, and roughly how the long purple will escape. That 5–10 second investment means you can then perform the entire sequence with confident, quick drags instead of hesitating mid‑move.
Once you start executing, commit. Redrawing the same gecko because the body doesn’t look pretty is how you burn the clock. If the path is functional and doesn’t block a lane you know you’ll need, keep it. Save your micro‑adjustments for the final one or two geckos when the timer is tight but the board is almost empty.
Booster Use: Optional, But Here’s Where They Help
Gecko Out Level 485 is beatable without boosters, but they can bail you out while you’re learning. A +time booster is the safest choice; use it right before you open the horizontal gate so you have plenty of time to route the bottom geckos.
If you have a hammer‑style tool, the highest‑value target is the red X block next to the gate. Removing that gives the bottom section a much wider opening and makes the long purple gecko far easier to route. I wouldn’t spend a hammer on a star block; learning the star routes teaches you skills you’ll reuse in later Gecko Out levels.
Mistakes, Fixes, and Logic You Can Reuse in Other Gecko Out Levels
Common Mistakes And How To Fix Them
- Dragging big zigzags “just because.” Every extra corner creates more chances to block a corridor. Fix: always ask yourself, “Can this gecko reach its exit with one fewer bend?” and redraw early paths to be as straight as possible.
- Using the wrong gecko to hit stars. People often send the tall brown or central beige gecko through the star cluster, then get stuck. Fix: assign stars to edge geckos (red, yellow, pink) whose bodies can rest against walls.
- Exiting the black bottom‑left gecko too early. That easy win often leaves its body lying across where yellow or beige need to move. Fix: wait until the gate is open and you’ve repositioned nearby geckos before sinking it into the tan hole.
- Opening the gate before clearing the upper clutter. If too many geckos remain in the top half, the new traffic from below causes chaos. Fix: clear blue and brown, park pink and yellow, then open the gate.
- Panicking when the timer turns red. That’s when people start redrawing paths and make things worse. Fix: commit to your planned final three moves and drag decisively; a slightly inefficient path that actually finishes beats a perfect path you never complete.
Reusing This Logic On Other Levels
The logic from Gecko Out Level 485 is gold for other knot‑heavy, gang‑gecko, or frozen‑exit stages. Anytime you see a gate plus star tolls, think “Who are my edge workers?” and assign the star jobs to geckos that can hug walls. When exits are frozen or warning holes sit near the right ones, you can reuse the same idea of parking geckos along edges while you carefully thread the safe route.
Gang geckos (linked pairs) and frozen exits behave similarly to the cramped clusters here: you want to clear independent single geckos first, then deal with whichever group controls the main chokepoint. The habit of drawing ultra‑compact early paths and only using long sweeps on the final geckos will keep paying off.
Final Encouragement For Gecko Out 485
Gecko Out Level 485 looks brutal at first glance, and honestly, it kind of is. But once you see the board as a set of lanes and parking spots—clear top first, unlock the gate safely, then let the big bodies flow through—it turns into a satisfying, repeatable solve. Stick to the path order, keep your lines tight, and you’ll watch those last geckos dive into their holes with seconds still on the clock.

