Gecko Out Level 103 Solution Walkthrough | Gecko Out 103 Answer
How to solve Gecko Out level 103? Get step by step solution & cheat for Gecko Out level 103. Solve Gecko Out 103 easily with the answers & video walkthrough.


Gecko Out Level 103: Board Layout, Rules, and Win Condition
How the Board Looks at the Start
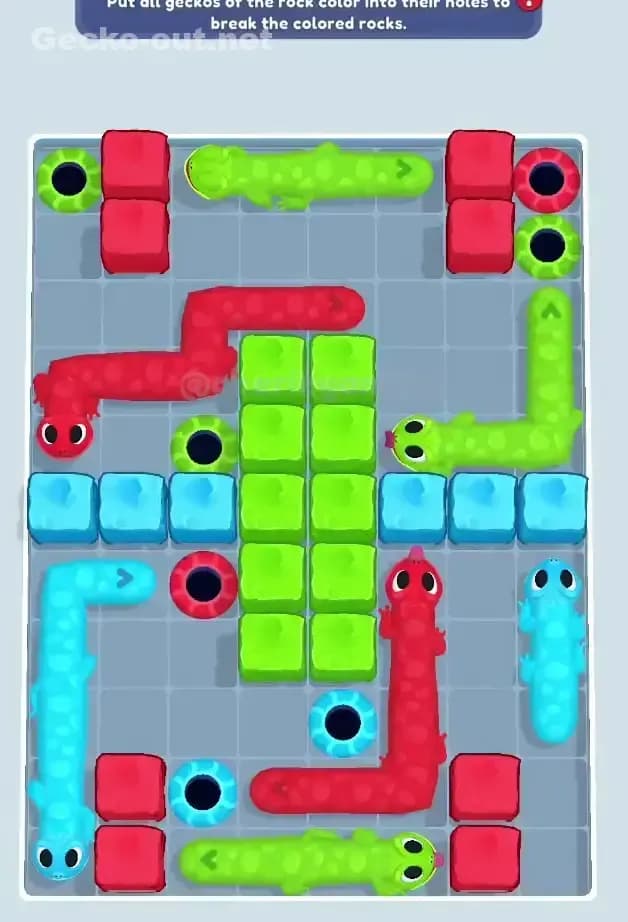
In Gecko Out Level 103 you’re dropped into a very packed grid with almost no empty cells. There are several geckos of different colors, most of them long and L‑shaped, plus a few short ones wedged in tight corners. You’ll see a giant red gecko stretching along the bottom, a long green one curled on the left side, and a tall pink gecko in the middle that’s basically acting like a pillar. On the right, a yellow‑and‑purple gecko hooks around the corner, and up top a beige‑and‑blue gecko runs from the center down and then across. Smaller blue and teal geckos are squeezed between these “big snakes,” waiting for a chance to slip out.
Walls are made of solid colored blocks that match the hole colors but don’t move at all, so they’re permanent barriers. Most exits are grouped near the edges: a cluster of holes on the upper left, a couple around the middle, and some down near the bottom corners. The key thing you feel right away in Gecko Out 103 is that almost every gecko is touching another one or a wall on at least two sides—so a random drag instantly jams something.
Win Condition and Why This Level Feels So Tight
As always, the win condition in Gecko Out Level 103 is simple on paper: drag each gecko’s head so its body follows the path into a same‑colored exit, and get all of them home before the timer runs out. The catch is how path‑based movement and the timer combine here.
Because the body follows your exact route, every little zigzag you draw becomes a permanent “cable” lying on the floor until that gecko escapes. In Gecko Out 103, the board is so congested that one bad curve can cut off two or three exits at once. You don’t have time to redraw paths over and over; the timer punishes hesitation and sloppy reroutes. You need to think in terms of lanes: where each gecko will pass, and what will still be open afterward. The level is basically a knot, and the only way to win is to undo strands in the right order without tightening the knot further.
Pathing Bottlenecks and Logical Traps in Gecko Out Level 103
The Main Bottleneck Corridor
The single biggest bottleneck in Gecko Out 103 is the central vertical corridor formed by the tall pink gecko and the blocks around it. That column controls access between the top half of the board and the bottom half. The big red gecko’s body, the small teal gecko in the middle, and the L‑shaped orange/teal gecko all depend on that space opening up. If you move the pink gecko in the wrong direction, you either:
- Seal the lower exits behind its body, or
- Block the top cluster of holes so nothing else can reach them.
The second bottleneck is the right edge, where the yellow‑and‑purple gecko and a line of ice‑blue blocks pinch the path. Any gecko that wants to slip along the right side relies on that yellow gecko getting out of the way cleanly.
Subtle Problem Spots That Ruin Runs
There are a few traps that don’t look dangerous at first:
- The small blue/green L‑shaped gecko near the bottom‑right looks like easy early points, but if you drag it across the red gecko’s route you can permanently block the red gecko’s exit path.
- The beige‑and‑blue gecko near the top spans both the middle and the right side. If you send it through a tight zigzag, it becomes a long fence that keeps the green and pink geckos from ever turning out.
- The short teal gecko in the central lower area is deceptively important. A lazy S‑shaped path from it can cut the middle of the board in half, forcing everyone else to take huge detours and wasting your timer.
All of these are fixable, but only if you notice them before you lock the board down.
When the Solution Starts to Click
My first few attempts at Gecko Out Level 103 felt brutal. I’d free one gecko, feel clever, then realize I’d just walled off three exits with its body. The turning point was when I stopped thinking “who can I finish right now?” and started thinking “who can I move that creates space without closing anything?” Once I treated the early moves as lane‑clearing instead of rushing to exits, the layout suddenly made sense. I could see a backbone route for the center, a dedicated lane on the right, and a final sweep along the bottom for the red gecko. After that, it stopped feeling like chaos and more like executing a plan.
Turn-by-Turn Path Strategy to Beat Gecko Out Level 103
Opening: Create Space Without Committing Exits
In the opening of Gecko Out 103, focus on three things: thin out the right side, loosen the center, and don’t touch the red gecko yet.
- First, nudge the yellow‑and‑purple gecko on the right upward and around its nearby blocks so it can exit cleanly without ever jutting into the central corridor. Draw as straight a route to its hole as you can.
- Next, adjust the beige‑and‑blue gecko near the top. Guide it along the top edge and into its exit in a straight or gently curved line that stays away from the central column. This opens the right and top lanes simultaneously.
- Finally, reposition the small blue/green gecko at the bottom‑right, but “park” it. Drag a short path that tucks it against the right wall without crossing under the pink gecko or over the red gecko’s future route. Don’t send it home yet if doing so would block the red path.
After these moves, the top and right edges breathe a lot more, which is exactly what you want before touching the big central pieces.
Mid-game: Manage the Central Column and Long Bodies
The mid‑game of Gecko Out Level 103 is all about the pink, green, and teal/orange geckos in the middle.
- Start with the green gecko on the left, guiding it around in a smooth curve so it exits through its nearby hole without wrapping behind the pink gecko. That frees blocks on the left and widens the central space.
- Now take the tall pink gecko. Drag its head in a clean vertical or L‑shaped line toward its matching hole, making sure its body ends up hugging a wall rather than cutting across the board. When done right, the pink gecko leaves a long straight lane behind it.
- Use that new lane for the short teal gecko and the orange/teal L‑shaped gecko. Route them so their bodies lie along edges or inside already‑used corridors instead of across future exits.
Your goal in this phase is to end up with most of the middle cleared, with only the big red gecko and one or two small ones remaining.
End-game: Exit Order and Racing the Timer
The end‑game in Gecko Out 103 is where runs usually live or die. By now the board should be much more open, but the timer will be low.
- First, clear any remaining short geckos (like the parked blue/green one on the right). Since the center is free, they should have fast, direct lines to their holes.
- Then, set up the red gecko’s route. Before you actually start drawing, check that no remaining body segments cut across the lane from the red head to its exit—usually a sweeping curve along the bottom and then up or around a wall.
- Drag the red gecko in one confident motion. Don’t wiggle; every unnecessary turn costs time and blocks space you might still need if you misread an exit.
If you’re extremely low on time and you still have one short gecko after the red, prioritize whichever has the fewest turns to reach its hole—even if it means using a slightly inefficient path for red. Time beats elegance here.
Why This Path Order Works in Gecko Out Level 103
Using Head-Drag Pathing to Untangle the Knot
This plan for Gecko Out Level 103 works because you’re always using each gecko’s body as a tool, not a random trail. By clearing the yellow and beige geckos first, you carve out the right and top edges, giving long geckos somewhere to pass later. Then the pink and green geckos are moved in ways that leave straight, usable corridors instead of jagged barriers.
Since the body perfectly follows your drawn path, straight lines and wall‑hugging routes mean future geckos can cross behind or beside them without conflict. You’re effectively “combing” the knot outwards from the edges rather than yanking at the middle.
Balancing Planning Time and Fast Execution
On Gecko Out 103, you can’t just rush from the first second; you’ll lose more time fixing mistakes. I recommend:
- At the start, take a couple of seconds to trace imaginary paths with your eyes: who leaves the board without crossing the center?
- During the opening and mid‑game, pause briefly before each long gecko to visualise the final shape of its body.
- In the last two geckos, stop thinking and just execute. You should already know the routes; the risk then is hesitating, not choosing the wrong line.
That mix of early planning and late speed fits the tight timer of Gecko Out Level 103 really well.
Boosters: Optional, Not Required
You don’t need boosters to beat Gecko Out 103, but they can save a messy run:
- An extra‑time booster is best used right after you clear the central column, giving you breathing room to set up the red gecko.
- A hammer‑style blocker remover is overkill here; the puzzle is about path order more than hard walls.
- Hints are okay if you’re completely stuck, but I’d only use one to check whether your opening gecko choices match the intended flow.
If you follow the lane‑first strategy, you should be able to clear Gecko Out Level 103 consistently without spending anything.
Mistakes, Fixes, and Logic You Can Reuse in Other Gecko Out Levels
Common Mistakes in Gecko Out Level 103
Here are the biggest errors I see (and made myself):
- Exiting the small blue/green gecko too early and blocking the red’s future lane. Fix: park it along the right wall first, then finish it near the end.
- Sending the pink gecko through a twisty path that slices the board in half. Fix: keep it straight and hugging one wall so it opens space instead of stealing it.
- Zigzagging the beige‑and‑blue top gecko through the center. Fix: push it along the top edge and out, never dipping into the middle more than necessary.
- Overthinking while the timer runs. Fix: decide your opening three moves before you touch the screen, then commit.
- Drawing “pretty” spirals with long geckos. Fix: think like a road engineer—straight lanes, clear intersections.
Reusing This Logic in Other Knot-Heavy Levels
The habits you build on Gecko Out Level 103 are perfect for later, harder stages:
- Clear edge geckos first when they can exit without stealing central space.
- Use long geckos to create neatly aligned walls, not random curves.
- Park short geckos in harmless corners instead of rushing them into awkward exits.
- Always identify the one or two key corridors that everyone needs, and protect them from being crossed.
This works just as well when you get gang‑linked geckos or frozen exits; you’re still prioritising turning the most restrictive pieces into clean boundaries.
Final Encouragement
Gecko Out 103 looks overwhelming at first, but once you see it as a set of lanes instead of a mess of colors, it becomes totally manageable. If you take a breath, clear the right and top edges first, straighten out the central column, and save the huge red gecko for a clean finish, you’ll watch the whole knot unravel. Stick with that plan and Gecko Out Level 103 goes from “impossible” to “actually pretty satisfying” in just a few runs.