Gecko Out Level 139 Solution Walkthrough | Gecko Out 139 Answer
How to solve Gecko Out level 139? Get step by step solution & cheat for Gecko Out level 139. Solve Gecko Out 139 easily with the answers & video walkthrough.


Gecko Out Level 139: Board Layout, Rules, and Win Condition
What The Board Looks Like
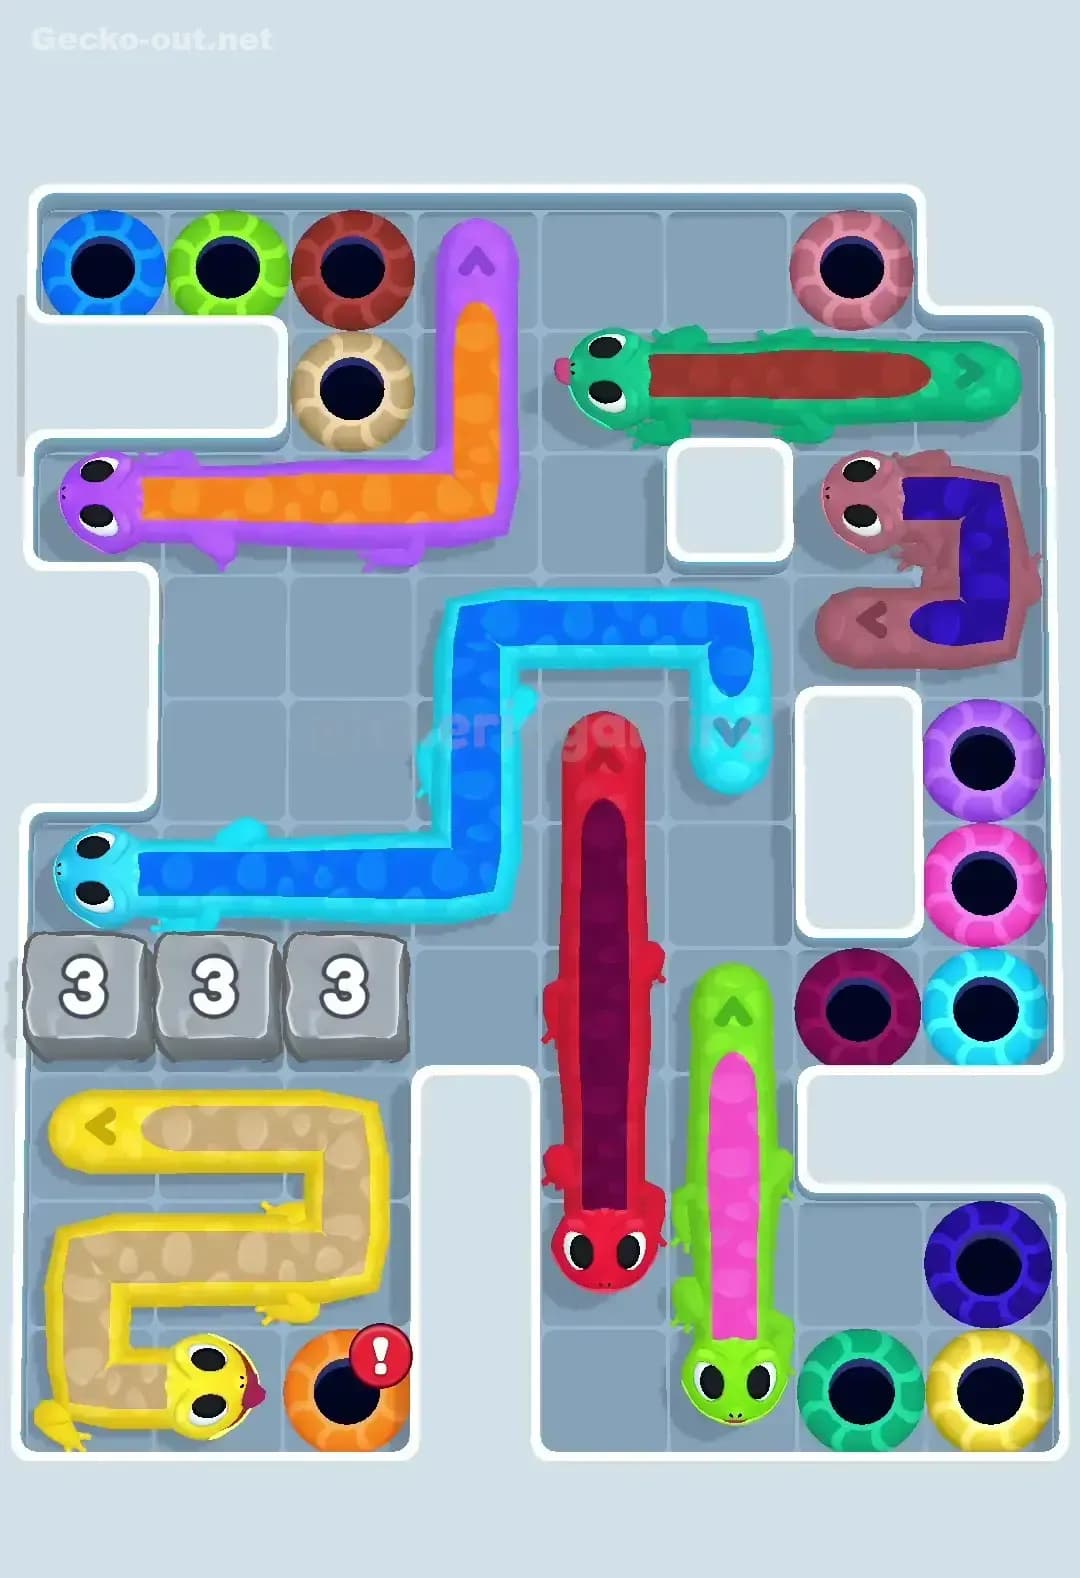
When you open Gecko Out Level 139, it looks like a total tangle. You’ve got five main geckos stretched across three vertical “lanes” of corridors:
- A blue/cyan gang gecko hugging the very top, snaking left to right across a tight U‑shaped maze.
- A short purple/green gang gecko in the upper‑right lane, partly frozen behind an icy strip marked with a “4”.
- A long orange gecko in the middle lane, bent into an L shape that dominates the central passages.
- A long red/green gang gecko in the lower middle, running horizontally toward the right side.
- A very long yellow/purple gang gecko along the bottom, almost spanning the entire row.
Exits (holes) are scattered mostly on the left and bottom edges. Several of them have red exclamation marks, meaning they’re “warning holes” you must avoid for the wrong color gecko. On the right you’ve got an icy vertical corridor with that “4” counter, and at the bottom left there are frozen tiles with “7” and “8” sitting on top of exits. In Gecko Out 139, almost every safe hole is either iced, hemmed in by other geckos, or one drag mistake away from a wrong-color drop.
Win Condition And Why This Level Feels Tight
The core rule still applies: in Gecko Out Level 139, every gecko segment has to reach a hole of its own color. Gang geckos share a body, so when the first color reaches its exit, that color peels off and the rest of the body remains for the other color to finish.
What makes Gecko Out 139 tricky is how the strict timer interacts with path-based movement:
- You drag the head, and the body traces the exact path.
- Every extra loop you draw both burns time and leaves a thick “snake wall” behind you.
- Frozen exits and icy counters (4, 7, 8) mean you can’t just rush one color to freedom; you need a specific order to unlock the right tiles in time.
If you freestyle here, you’ll either block the central lanes with your own bodies or run the clock down while you’re trying to untangle the mess. Planning your exit order is basically the whole puzzle.
Pathing Bottlenecks and Logical Traps in Gecko Out Level 139
The Main Bottleneck Corridor
The single biggest bottleneck in Gecko Out Level 139 is the central middle lane where the orange gecko sits. That lane is your only realistic way to:
- Bring the top blue/cyan gang down toward the lower exits.
- Rotate the purple/green gang from the right side toward its holes.
- Slide the red/green and yellow/purple gangs so they can reach their correct exits without crossing warning holes.
If you park the orange gecko badly—especially if you leave it straight across the center—you basically wall off the board from itself. I treat orange as a movable barrier: you use it early to open space, then tuck it away on the left so everyone else can pass.
Subtle Problem Spots
There are a few places where Gecko Out 139 quietly punishes lazy paths:
-
Warning holes near the top-left cluster. The green and purple exits just under the blue/cyan gang sit right on natural turning points. If you drag too close while looping that gang around, it’s very easy to drop the wrong color into a hole and instantly fail.
-
The frozen bottom exits (7 and 8). Those numbers tempt you to clear bottom geckos first, but if you rush the yellow or red gecko before you’ve opened paths above, you’ll strand one color behind ice or a body wall with no time to fix it.
-
The right-side icy lane (4). The purple/green gang there doesn’t have much room. If you try to move it before the board is opened up, you’ll create a permanent vertical wall that slices the map and forces ugly, time‑wasting detours.
When The Solution “Clicks”
The first time I played Gecko Out Level 139, I kept trying to solve it from the bottom up—“clear the long yellow gecko first, that’s obviously the problem,” right? Every attempt ended with me staring at a frozen exit or a gang gecko whose remaining color couldn’t reach anything.
The level clicked when I realized it’s not about which gecko is longest; it’s about which corridor they occupy. Once I focused on freeing the central lane (by moving orange smartly) and using the top blue/cyan gang to “draw” safe routes before dropping anyone into holes, the whole thing turned from chaos into a precise little sequence.
Turn-by-Turn Path Strategy to Beat Gecko Out Level 139
Opening: Creating Space Without Jamming The Board
-
Start with the orange gecko in the middle.
Drag its head along the central lane just enough to straighten it and then park most of its body along the left side, near its own exit cluster. The goal is to clear the vertical center, not to finish orange yet. -
Next, reshape the blue/cyan gang at the top.
Pull the head down through the newly opened central gap, but keep it away from the warning holes on the left. Use a smooth S‑curve through the central column and “store” the blue/cyan body along the right edge, just under the icy “4” lane. Don’t exit either color yet—this gecko is your flexible rope. -
Keep the bottom geckos still for now.
Leave yellow/purple and red/green more or less in their starting rows while you set up the top and middle. Moving them too early tends to clog your future exits.
By the end of the opening, the center lane should be mostly empty, with orange tucked left and blue/cyan stretched along the right. You’ve basically untied the middle knot without committing to any exits.
Mid-game: Holding Lanes Open And Unlocking Paths
-
Use blue/cyan to trigger the first safe exits.
Now guide the cyan half (if possible) into its correct hole in the mid‑left cluster, using the body you already laid as a guide path. As cyan peels off, you keep enough of the remaining body to still move blue later. -
Free the purple/green gang from the right icy lane.
With the central column clear, slowly drag this gang gecko down, using the gap between orange (left) and the right wall. Your goal is to wrap it underneath the central obstacle and aim toward the lower exit cluster, without overrunning the bottom exits yet. -
Carefully reposition red/green.
Slide the red/green gecko a bit left so that its body forms a low horizontal lane, but stop short of blocking the step that leads into the frozen “7” and “8” exits. Think of red/green as a short bridge you’ll cross later, not a wall.
Throughout this mid-game phase, keep asking: “If I exit this color now, will the remaining body cut off anyone?” If the answer is even “maybe,” keep that color alive a little longer and park it against the outer walls instead.
End-game: Exit Order And Time Management
At the end of Gecko Out 139, almost everything is about exit order:
-
Clear the upper and mid‑left exits first.
Finish off the remaining blue segment and then guide orange into its own hole once you’re sure the center lane won’t be needed anymore. These exits often help unlock the frozen 4/7/8 tiles if they’re tied to count‑based unfreezing. -
Open the bottom frozen exits.
Once the counters have ticked down, use the purple/yellow gang at the bottom. Guide purple into its correct hole first (usually the one next to the frozen block), then sweep the remaining yellow length along the bottom corridor into its exit. -
Finish with the red/green and right-side purple/green.
Use the space left by yellow’s exit to curve green and red into their final holes. Because you kept them relatively short and low during mid‑game, they should have straight or gently curved paths into the now‑open bottom exits, with almost no chance to self‑trap.
If you’re low on time near the end, don’t redraw fancy paths. Use the bodies you’ve already laid as “rails” and make the shortest possible adjustments to reach each hole.
Why This Path Order Works in Gecko Out Level 139
Exploiting The Head-Drag Body-Follow Rule
The whole plan for Gecko Out Level 139 relies on using geckos as temporary, movable walls:
- You first drag orange and blue/cyan to shape the open corridors before any exits happen.
- Because the body follows the exact path, these early routes become pre‑drawn tracks you can reuse to slip other colors through without re‑pathing.
- You avoid tight spirals and instead use long outer‑edge arcs, so when a color peels off at its hole, the remaining body still sits in useful, non‑blocking positions.
Instead of tightening the knot every time you move, you’re deliberately laying down straight “lanes” that all later geckos can reuse.
Balancing Thinking Time And Execution Speed
On Gecko Out 139, I’d split the timer mentally:
- First third: Don’t rush. Just study the board and plan where you’ll park orange and blue/cyan. One slow, clean opening is better than three panicked restarts.
- Middle third: Commit. Once the middle lane is clear and your first color is out, move smoothly; re‑using existing paths keeps drawing time low.
- Final third: No more re‑routing. At this point you should only be nudging heads along known lanes into already-open exits.
If you catch yourself redrawing a path three times in the end-game, it’s usually faster to restart the level with the right order than to try to “salvage” a nearly locked board.
Do You Need Boosters?
For Gecko Out Level 139, boosters are helpful but not required:
- An extra time booster is nice if you’re still learning the path; popping it right after you’ve opened the central lane gives you more breathing room for the precise end-game exits.
- A hammer/unstick style tool is overkill here. If you’re blocked, it usually means the exit order went wrong; you’ll learn more by restarting than by smashing one obstacle.
- Hints can show the intended first move, but once you understand the corridor logic, you shouldn’t rely on them.
I recommend solving Gecko Out 139 clean at least once—it’s satisfying and makes later levels easier.
Mistakes, Fixes, and Logic You Can Reuse in Other Gecko Out Levels
Common Mistakes And How To Fix Them
-
Exiting the orange gecko too early.
That locks the central lane. Fix it by always parking orange on the left first and only exiting it after blue/cyan and the right-side gang have passed through. -
Dropping a head into a warning hole.
Those exclamation-mark exits are placed right on natural corners. Slow down when your drag line gets near a hole; give yourself one empty tile of clearance when turning. -
Unfreezing the bottom exits without space to use them.
Players often focus on the “7” and “8” counters and then realize the remaining geckos can’t physically reach those exits. Make sure any long gang geckos are already stretched toward the bottom before you trigger the final freezes. -
Over‑looping paths.
Big spirals feel clever but build huge body walls. In Gecko Out Level 139, favor short, straight corridors along the outer walls whenever possible. -
Panicking in the last few seconds.
Rushed redrawing usually creates new blockages. If the end-game looks messy, it’s almost always a sign the early parking was wrong; restart with a calmer opening.
Reusing This Logic On Other Knot-Heavy Levels
The approach that beats Gecko Out 139 scales really well:
- Identify the true bottleneck lane, not just the longest gecko.
- Use early moves to store bodies along outer edges, leaving a clean central route.
- Treat gang geckos as tools, not obstacles: one color exits first, leaving a perfectly shaped path for the partner color.
- Delay frozen exits until your geckos are already aimed at them, so you don’t waste the unlocked space.
Any time you see icy counters, gang bodies, and warning holes together, you can fall back on this same order‑driven thinking.
Final Encouragement
Gecko Out Level 139 looks brutal at first glance, but once you see that the puzzle is really about clearing and preserving the central lane, it becomes a very fair challenge. Give yourself a few runs just to practice the orange and blue/cyan “parking” phase, then commit to the exit order and trust the plan. With that structure in your head, Gecko Out 139 stops being a frustrating knot and turns into one of those levels you can beat in a smooth, satisfying flow.