Gecko Out Level 180 Solution Walkthrough | Gecko Out 180 Answer
How to solve Gecko Out level 180? Get step by step solution & cheat for Gecko Out level 180. Solve Gecko Out 180 easily with the answers & video walkthrough.


Gecko Out Level 180: Board Layout, Rules, and Win Condition
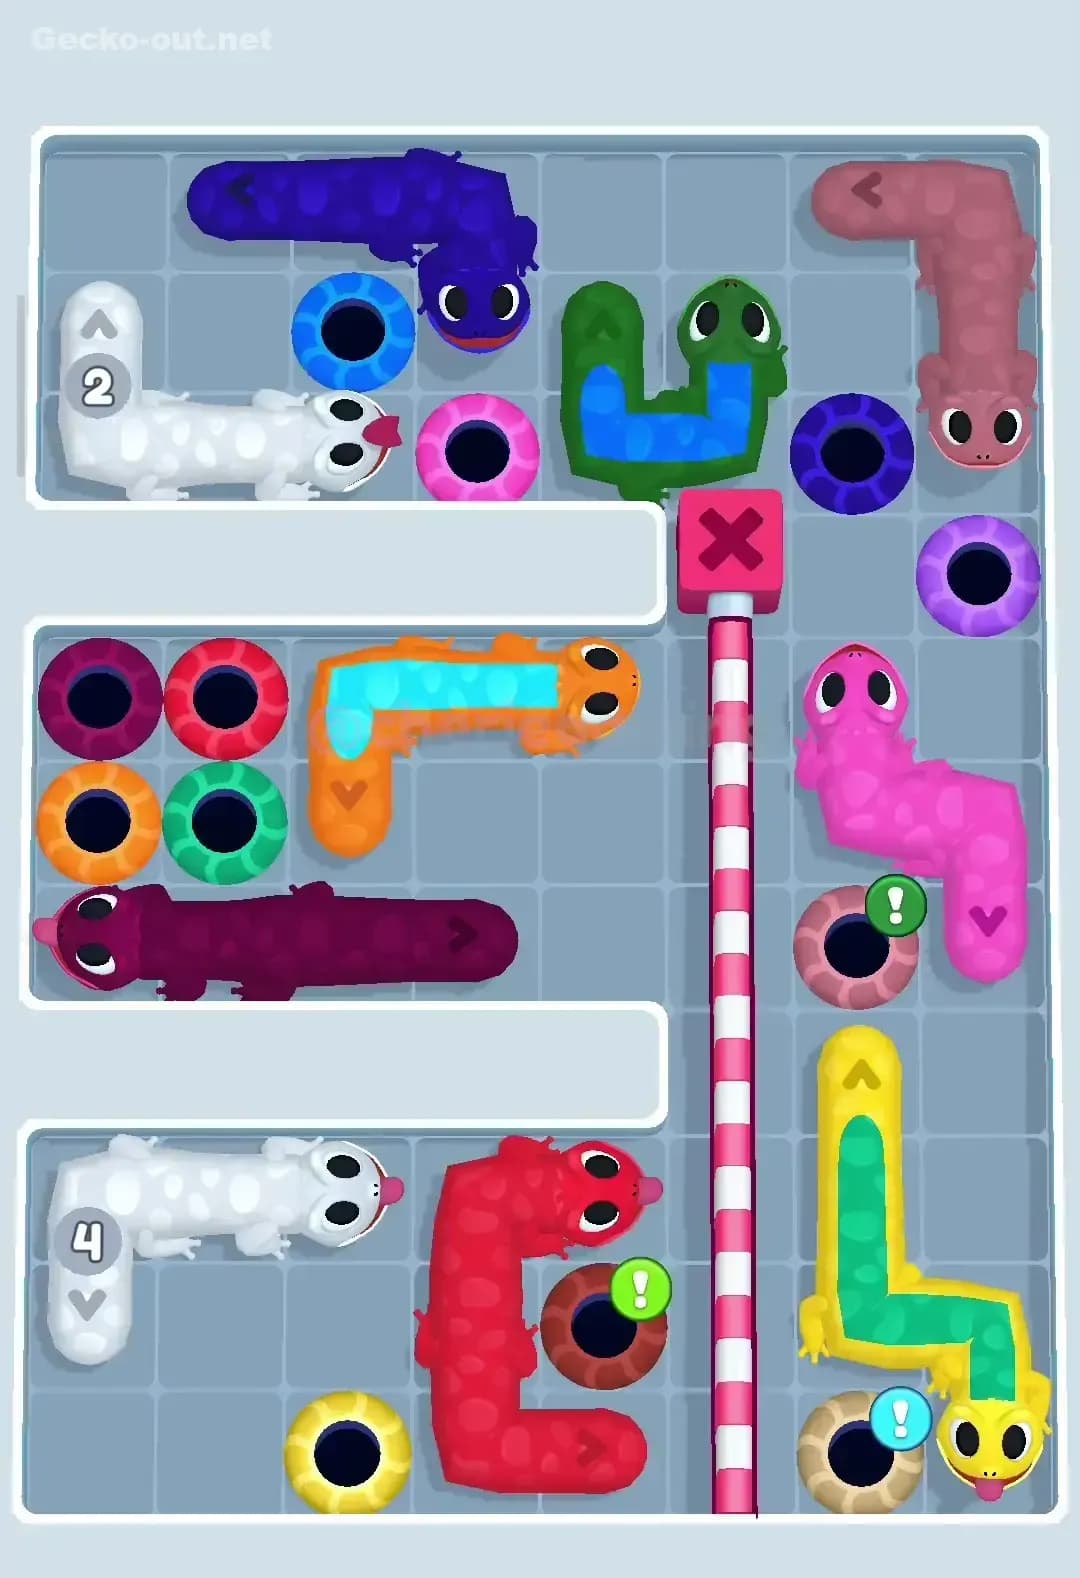
What The Board Looks Like
In Gecko Out Level 180 you’re juggling a lot of bodies in a cramped grid:
- A long yellow gecko curls around the lower left, almost forming a big U that guards the entire bottom of the board.
- A red gecko runs horizontally through the middle, nose pointing toward the right side. It’s wearing a little timer icon.
- A cyan gecko sits in the upper‑left half of the middle, also wearing a timer icon and partly tucked under the yellow/orange cluster.
- An orange gecko and a short green segment knot around the middle‑lower area, wedged between yellow and cyan.
- A pink gecko sits on the lower‑right, turned inward and blocking the way from the center to the bottom exit row.
- A purple gecko is caged in by red blocks in the top section, with only a narrow corridor leading out.
- Solid red and purple wall blocks split the board into top, middle, and bottom zones, and there are a couple of arrow blocks that only slide in the direction they show.
Exits are scattered: one on the right for blue, one on the right‑top for red, a column on the left, and a full row of colored holes along the bottom that match yellow, pink, green, purple, and orange. Gecko Out 180 looks overwhelming at first because nearly every exit lane is already half‑occupied.
Win Condition And Why It Feels Tight
As always, you win Gecko Out Level 180 by dragging each gecko’s head so its body follows the path into the matching‑color hole:
- Geckos can’t cross walls, each other, or exits that aren’t their color.
- The body copies your exact path, so every extra wiggle wastes space and time.
- The timer is strict, and the two geckos with watch icons are your time batteries: when they escape, you get a tiny breather.
What makes Gecko Out 180 tricky is that one wrong drag locks the board. Because the yellow and red geckos are so long, if you snake them around carelessly, you block off the narrow corridors you need later and don’t have time left to undo it.
Pathing Bottlenecks and Logical Traps in Gecko Out Level 180
The Main Bottleneck
The single biggest bottleneck in Gecko Out Level 180 is the combo of the long yellow gecko plus the red gecko stretched through the middle:
- Yellow guards the entire bottom row where most exits are.
- Red slices the board horizontally, cutting the top from the bottom.
- Neither can exit immediately, so if you move them first, they just tangle everyone else.
The real job early on is to create vertical lanes around these two without letting them sprawl.
Subtle Problem Spots You Need To Respect
There are a few less obvious traps:
- The right‑side choke: The pink gecko and the arrow block near the right edge share a tiny corridor with the blue exit. If you park a body there, you’ll later have no way to slide the arrow block or get blue/red out.
- The top cage around purple: The red walls at the top form a U‑shape. If you pull purple down too far before you’re ready, its body loops under the cage and blocks the route that other geckos need to cross from top to middle.
- The bottom exit row: It’s tempting to “pre‑line up” multiple geckos right on top of their holes. In Gecko Out 180 that backfires, because you need to pass through that row multiple times. A gecko parked directly in front of a wrong‑colored hole acts like a permanent wall.
When The Level Starts To Make Sense
The first few times I played Gecko Out Level 180 I tried to free the giant yellow gecko immediately. That always ended in a knot and a red timer hitting zero.
The run that finally worked flipped my thinking: I targeted the time‑icon geckos first, then cleared small, precise paths while keeping yellow and red almost in their starting lanes. Once I saw that the puzzle was about “hold the big ones still, free the short ones,” everything clicked. You’re not untying the whole knot at once—you’re pulling out one strand at a time.
Turn-by-Turn Path Strategy to Beat Gecko Out Level 180
Opening: Safe First Moves And Parking Spots
Your opening in Gecko Out 180 should be calm and deliberate:
- Create space on the right: Nudge the pink gecko slightly downward and away from the central lane, just enough so the right‑side arrow block and blue exit lane are clear. Don’t drag a long path; keep it compact.
- Free the cyan time gecko:
- Drag the cyan head along the shortest route toward its matching blue exit on the right.
- Hug the walls and avoid looping behind other bodies.
- Once it’s out, you gain time and free up a surprising amount of middle space.
- Park the orange and green in the middle: Shift the orange and little green segments so they sit in the central zone but don’t occupy the bottom row or the tiny right‑side corridor. Think of the central 2×3 area as your parking lot.
Make sure yellow and red barely move during this phase. If you must adjust them, slide only a square or two to open space, then put their heads back in straight lines.
Mid-game: Keeping Lanes Open And Moving The Long Bodies
Mid‑game in Gecko Out Level 180 is about reorganizing the big geckos without cutting off exits:
- Release the red time gecko next:
- Open a vertical lane on the right by keeping pink low and central geckos tucked in.
- Drag red’s head to its red exit at the top‑right in one clean sweep, maybe with one corner turn.
- Don’t swing red across the center first; that’s how you block both top and bottom at once.
- Prep the purple gecko:
- Slide any middle geckos away from the top corridor.
- Move the top arrow block (if present in your layout) in its allowed direction to widen the cage exit.
- Pull purple out of the cage only as far as needed to join the central parking area, keeping its tail near the top. You want purple poised for a later dash to a purple hole, not coiled around the center.
- Reposition yellow carefully:
- Gently lower yellow so its body runs mostly along the left edge and lower row, but leave gaps between it and the bottom exit row.
- The goal is to let other geckos slip between yellow and the exits later.
By the end of mid‑game, you want: cyan and red already gone, pink low/right, purple near the upper middle, and orange/green in the center with room to pass.
End-game: Exit Order And Low-Time Choices
The end‑game of Gecko Out 180 is where you cash in all that careful arranging:
- Clear the central short geckos first:
- Take orange to its matching hole on the bottom row through the central lane.
- Send the small green segment to the green hole on the same row.
- Because yellow isn’t blocking the exact holes, they can slip through quickly.
- Send purple home:
- From the upper middle, guide purple in a straight or L‑shaped path to the nearest purple exit (either the left column or bottom‑row purple, depending on how you’ve arranged).
- Avoid spiraling around other bodies; at this point, long detours are dangerous.
- Finish with pink, then yellow:
- Move pink from the right side straight down and across to its pink hole in the bottom row.
- Finally, drag the long yellow gecko into the remaining yellow exit. Because everything else is gone, you can make a wide, safe curve without worrying about blocking someone.
If you’re low on time, prioritize shortest‑path exits. For example, if purple can reach a bottom purple in three moves but the left column route is five turns, take the shorter one even if it wasn’t your original plan.
Why This Path Order Works in Gecko Out Level 180
Using Head-Drag Logic To Untangle Instead Of Tighten
In Gecko Out Level 180, dragging heads in big loops is the fastest way to lose. This plan fixes that by:
- Removing the timed geckos first, which frees space and buys time.
- Keeping long bodies (yellow, red) mostly straight until late, so they act like temporary walls instead of knots.
- Always moving geckos from “deepest in the knot” toward open exits, never dragging a free gecko back into the mess.
Because the body mirrors your exact path, every curve you draw becomes permanent. The sequence above minimizes those curves until the board is mostly empty.
Timer Management: When To Think And When To Commit
For Gecko Out 180, I’d break timing into two modes:
- Planning mode: At the very start and just before mid‑game, take a second to read the board. Visualize where cyan and red will pass, and where your parking lot in the center will be.
- Execution mode: Once you start a critical drag (like red’s final run to its exit or yellow’s last sweep), commit and move confidently. Pausing mid‑drag just leads to wiggly paths and wasted squares.
You actually save time by thinking for a few seconds, then drawing one clean route, instead of three panicked partial paths.
Are Boosters Needed In Gecko Out 180?
Boosters in Gecko Out Level 180 are optional if you follow this order, but here’s how they help:
- Extra Time: If you’re still learning the routes, using a time booster before starting can make your first clear much more relaxed.
- Hammer-style remover: If you really misplace a long gecko, a hammer on a non‑critical wall block can reopen a lane—but this level is designed to be solvable without that.
- Hints: A hint here usually shows you which gecko to move next (often a time‑icon gecko). Use it if you keep starting with yellow or purple and getting stuck.
I’d treat boosters as training wheels: nice while you’re mastering Gecko Out 180, but not required once the pattern is in your muscle memory.
Mistakes, Fixes, and Logic You Can Reuse in Other Gecko Out Levels
Common Mistakes And How To Fix Them
In Gecko Out Level 180, I see the same errors over and over:
- Moving yellow first: This instantly fills the board with its body. Fix: barely touch yellow until the last phase.
- Parking in the right corridor: Leaving pink or another gecko in front of the blue/red exits locks out both time geckos. Fix: always keep that corridor clear until cyan and red are gone.
- Over‑dragging paths: Wiggling heads around “just to see what happens” makes spaghetti you can’t undo in time. Fix: plan a route mentally, then draw only that line.
- Blocking the bottom row early: Standing geckos directly on top of their bottom holes too soon prevents others from passing across. Fix: park in the middle, not on the exits, until you’re ready to actually finish that gecko.
- Ignoring the timer icons: Leaving cyan or red until last means you never get their bonus time. Fix: make at least one time‑icon gecko an opening priority.
Reusing This Logic In Other Knot-Heavy Levels
The tricks from Gecko Out Level 180 carry over really well:
- Free short, central geckos first to create a parking zone.
- Treat long geckos as movable walls; only untangle them after the board is mostly clear.
- Keep choke corridors (single‑square lanes) empty unless you’re actively sending someone through.
- Use time‑icon or gang‑linked geckos early to unlock the board’s structure before dealing with the big snakes.
Whenever you see “giant body + tiny exit row,” think back to Gecko Out 180 and ask: “Can I solve this with the big guy barely moving until the end?”
Encouragement For Beating Gecko Out 180
Gecko Out Level 180 is absolutely one of those stages that feels impossible on first sight and then suddenly feels fair once you know the order. If you:
- Clear cyan and red early,
- Keep yellow and red mostly straight until late,
- Use the middle as a parking lot and protect the bottom row and right corridor,
you’ll watch the knot fall apart in a really satisfying chain of exits. Stick with that plan, refine your drag paths to be cleaner each attempt, and Gecko Out 180 will go from “wall” to “warm‑up” for even harder levels.