Gecko Out Level 173 Solution Walkthrough | Gecko Out 173 Answer
How to solve Gecko Out level 173? Get step by step solution & cheat for Gecko Out level 173. Solve Gecko Out 173 easily with the answers & video walkthrough.


Gecko Out Level 173: Board Layout, Rules, and Win Condition
Starting Layout and Obstacles
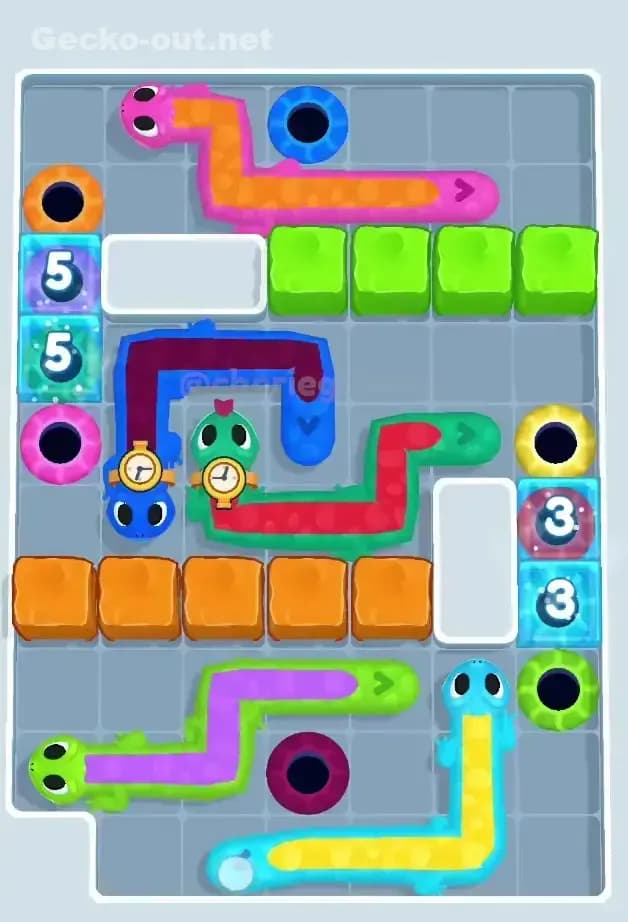
In Gecko Out Level 173 you start on a clean, open grid with no walls, locks, or ice. The difficulty doesn’t come from fancy obstacles; it comes from how tightly the geckos are packed.
You’ve got six long geckos, all standing straight up in a neat row:
- From left to right: orange, yellow, blue, purple, red, and green.
- Their bodies are tall and almost fill the board vertically, so there isn’t much spare space to weave around.
- Each gecko wears a little clock, which means every one of them can give you extra time when it reaches its matching hole.
The exits are color‑coded holes on the top and bottom edges:
- Top edge: green, yellow, and purple holes.
- Bottom edge: blue, red, and orange holes.
So three geckos have to exit upward and three downward. Because the geckos start in a tight vertical lineup, almost none of them can simply go straight to their exits; somebody always needs to cross past someone else’s column.
There are no gang links or frozen exits in Gecko Out 173, but the “obstacle” is the crowding itself. Every bad path you draw becomes a moving wall of lizard body that blocks later routes.
Win Condition, Timer, and Pathing Pressure
To win Gecko Out Level 173, you must:
- Guide each gecko head along a path to its same‑colored hole.
- Make sure their bodies never overlap each other, the edge of the board, or any hole that doesn’t belong to them.
- Finish before the strict timer runs out.
Because movement is “snake style” (the body perfectly follows the head’s route), every wiggle you draw is permanent until that gecko escapes. That’s the core puzzle: are you drawing paths that open space or paths that choke the board?
The clocks matter a lot here. Putting a clocked gecko into its hole gives you a time bonus, which lets you think more on the next moves. In Gecko Out 173 the best approach is to cash in the quickest, shortest exits first, then use the extra time to untangle the tricky ones near the end.
Pathing Bottlenecks and Logical Traps in Gecko Out Level 173
The Main Bottleneck Corridor
The single biggest bottleneck in Gecko Out Level 173 is the central lane occupied by the blue, purple, and red geckos. They sit shoulder‑to‑shoulder in the middle of the grid, and most paths that reach across the board have to pass through or around this cluster.
- The blue gecko wants a bottom exit.
- The purple gecko has a top exit.
- The red gecko wants a bottom exit again.
If you let any one of them sprawl sideways too early, it slices the board in half and forces the remaining geckos into awkward U‑turns. The trick is to clear the easiest bottom exits first, using short, vertical‑heavy paths, so the center of the board opens up for the late‑game top exits.
Subtle Problem Spots You Might Not Notice
There are a few quiet traps that make Gecko Out 173 nastier than it looks:
-
Blocking the entire top row. If you send a top‑exit gecko up and then shimmy sideways along the top edge, it can cover multiple holes and make it impossible for the other top‑exit geckos to reach their spots later.
-
Parking across the bottom. Likewise, if a bottom‑exit path hugs the entire bottom edge before diving into its hole, you’ll trap one or two bottom exits behind that body.
-
Over‑curving in the middle. Drawing cute spirals or big S‑curves for the early geckos feels safe, but every extra bend is a future wall someone else has to go around. On a level this tight, “simple and short” beats “fancy but safe.”
When the Solution Clicks
I’ll be honest: Gecko Out Level 173 feels like “it should be easy” and that’s exactly why it’s frustrating. I definitely had a couple of runs where five geckos were out, and the last one needed a single tile that was already blocked by someone’s tail.
The moment it clicked for me was when I stopped trying to solve every path at once. Instead, I treated the board as two jobs:
- First, cash in the quick bottom exits to open space and gain time.
- Then, use that open center to carefully weave the three top‑exit geckos without ever blocking each other’s holes.
Once you think of Gecko Out 173 in those two phases, the board suddenly feels organized instead of chaotic.
Turn-by-Turn Path Strategy to Beat Gecko Out Level 173
Opening: First Exits and Safe Parking
In the opening of Gecko Out Level 173, your priority is the bottom exits and quick time bonuses:
-
Blue gecko (third from the left).
- Drag its head mostly straight down toward the blue hole at the bottom side, adding a tiny sideways nudge only if you need to line it up.
- Keep this path narrow and avoid sweeping under the neighboring columns. This is your fastest, cleanest time boost.
-
Red gecko (second from the right).
- Once blue is gone, send red straight down to the red bottom hole.
- Again, minimal curves: a short vertical drop, then a small correction left or right if needed. Don’t let red stretch along the bottom edge.
-
Orange gecko (far left).
- Now you can guide orange down and along the bottom toward the orange hole.
- Hug the outer edge of the board with orange’s path so you don’t cut across the middle lanes that top‑exit geckos will need later.
By the end of this opening, the bottom edge is mostly clear and you’ve gained a comfortable time buffer. You’re left with yellow, purple, and green, all bound for the top.
Use the lower middle area as “parking space”: if you need to move a head out of the way briefly, make shallow loops near the bottom center where no exits remain.
Mid-game: Keeping Lanes Open for Top Exits
The mid‑game of Gecko Out Level 173 is all about the three top exits.
-
Yellow gecko (second from the left).
- Yellow’s hole is the top‑middle one, so it’s the most central and the most likely to get blocked.
- Take yellow up in as straight a line as you can manage. If you need to curve around green or purple, keep the curve tight and just one tile away from the other bodies.
- Avoid sliding yellow sideways across the top row; go up, then a quick tiny turn into the yellow hole.
-
Purple gecko (center-right).
- With yellow out, purple has more freedom.
- Draw its path up the right side toward the purple top hole, staying close to its starting column so you don’t bisect the board.
- As with yellow, don’t run purple along the top longer than necessary—rise and cut in.
Keep an eye on green during this. If you need to move green to give purple a lane, park green in a loose curve near the lower‑right area, not across the middle.
End-game: Final Green Exit and Time-Saving Tips
For the end‑game you’ll likely have only the green gecko left (far right, with the green top‑left hole still unused).
- First, pull green down a bit into any free space you’ve left on the lower half of the board, straightening out any awkward loops from earlier.
- Then swing green across and up toward the green top hole, following gaps already created by the geckos you’ve removed.
- Use the edges: aligning green’s body along the side walls reduces the chance of blocking an unseen route.
If you’re running low on time at this point:
- Don’t overthink tiny optimizations—draw the most direct safe line you can see.
- Remember the body follows exactly; quickly preview in your head where it will trail before committing to a big sideways sweep.
Why This Path Order Works in Gecko Out Level 173
Using Body-Follow Pathing to Untangle Instead of Tangle
This plan for Gecko Out 173 works because it respects how the body follows the head:
- Early geckos (blue, red, orange) take almost straight lines to the bottom, so their bodies leave thin, vertical “pillars” instead of wide barricades.
- Clearing those bottom exits first opens a large, empty playground in the lower half where you can park and adjust later geckos without risking overlaps.
- The top‑exit geckos then move through wide lanes, drawing short paths that don’t cross each other’s future routes.
You’re basically converting a six‑lane traffic jam into two empty lanes and three tidy through‑lanes, then exiting each remaining “car” one by one.
Balancing Thinking Time and Fast Execution
Managing the timer in Gecko Out Level 173 is about rhythm:
- On your first few attempts, take the loss and use them as scouting runs—watch which columns interfere with which exits.
- Once you’re comfortable, commit to quick, decisive drags for the first two or three geckos to build your time bank.
- Pause briefly before each top‑exit path. If you can mentally trace a clean path in two seconds, do it. If you can’t, wiggle the head a tile or two, reassess, then commit.
You don’t need to play at lightning speed the whole time—just burst‑fast on the obvious, straight‑down exits and slow‑careful when the board is half‑empty and the final routes really matter.
Booster Use: Optional, Not Required
For Gecko Out 173, boosters are optional:
- Extra-time boosters: Nice safety net if you’re consistently timing out on the last gecko, but you can clear the level reliably without them once you follow the order above.
- Hammer/obstacle removers: There are no true obstacles to break here, so you don’t gain much.
- Hints: A hint might suggest one clean path, but it won’t teach you the full ordering logic. Use it only if you’re totally stuck and want to see a sample route.
If you do use a time booster, pop it early, then rush the first two bottom exits to compound the bonus.
Mistakes, Fixes, and Logic You Can Reuse in Other Gecko Out Levels
Common Mistakes on Gecko Out Level 173 (and Fixes)
-
Dragging big horizontal lines at the top or bottom.
Fix: For Gecko Out 173, aim for vertical‑dominant paths; only turn sideways right before the hole. -
Solving the nearest gecko first instead of thinking about exits.
Fix: Always prioritize bottom‑exit geckos with short routes (blue → red → orange) to open space and gain time. -
Parking geckos in the center.
Fix: Use side walls and the lower half for parking. Avoid blocking the central vertical lanes that top‑exit geckos need. -
Rushing the final gecko with no mental preview.
Fix: Before the last move, stop for one second and visualize the body’s trail; if it obviously crosses itself or a hole, adjust before you drag. -
Restarting too slowly.
Fix: If you clearly mis‑draw an early path that ruins the layout, don’t try to salvage it—reset and re‑run your known sequence quickly.
Reusing This Approach in Other Levels
The logic you use to solve Gecko Out Level 173 transfers nicely to other tricky Gecko Out stages:
- On knot‑heavy levels, identify which exits are shortest and which paths will open the most space, and clear those first.
- On gang‑gecko or frozen‑exit levels, treat the “unlocked” or single geckos as your tools to carve clean corridors before you free the rest.
- When clocks are involved, always ask: “Which gecko gives me the quickest time bonus without making a mess?”
Thinking in phases—open space → weave carefully → finish clean—will carry you through a lot of late‑game Gecko Out puzzles.
Final Encouragement for Gecko Out Level 173
Gecko Out Level 173 looks like a simple lineup of colorful geckos, but it hides a real pathing challenge. Once you focus on:
- Clearing the bottom exits first for time and space,
- Keeping paths short and mostly vertical,
- Saving the interconnected top exits for a careful mid‑ and end‑game,
the whole level becomes predictable instead of chaotic. Stick to that order, don’t be afraid to restart while you’re learning the pattern, and you’ll have Gecko Out 173 completely under control.