Gecko Out Level 472 Solution Walkthrough | Gecko Out 472 Answer
How to solve Gecko Out level 472? Get step by step solution & cheat for Gecko Out level 472. Solve Gecko Out 472 easily with the answers & video walkthrough.


Gecko Out Level 472: Board Layout, Rules, and Win Condition
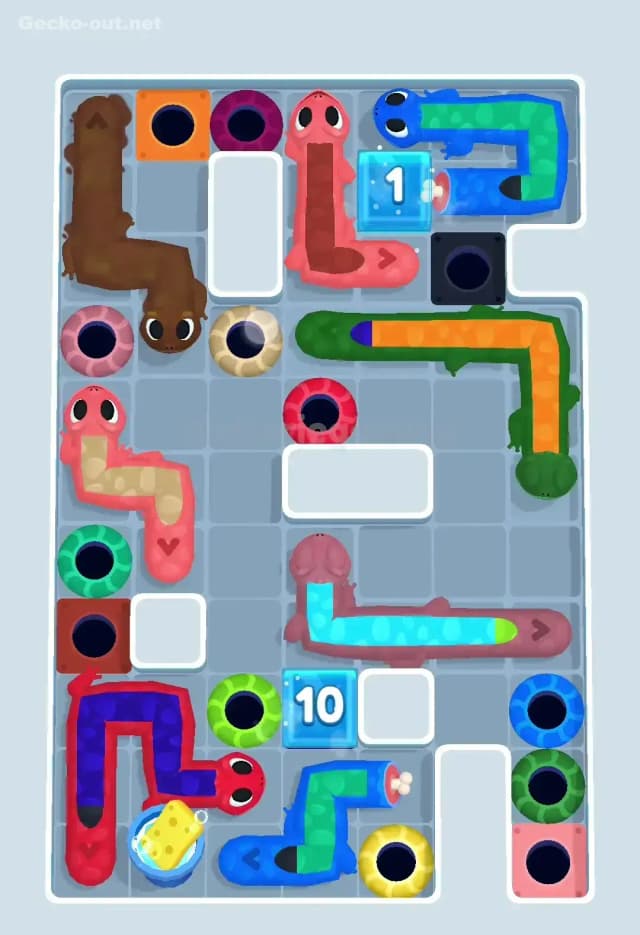
Starting Board Overview
In Gecko Out Level 472 you start on a tall, narrow board that’s already packed with long, bent geckos. There’s almost no free space, which is why this level feels brutal at first glance.
You’ve got:
- A tall purple gecko in the top-left, bent into an L and hugging two nearby purple/pink exits.
- A blue–green gecko in the top-right, wrapped awkwardly around a frozen “3” block and a blue exit.
- Two muddy-brown geckos in the middle lanes, both L-shaped and acting like walls for everyone else.
- A short pink gecko in the lower middle, facing toward a purple exit.
- A tall orange–green gecko on the right edge that runs from almost the bottom of the board up into the middle.
- A long red–blue gecko in the bottom-left corner, twisted around a corner and near a red exit.
- A short light-blue gecko near the bottom around a frozen “12” block and a yellow exit.
White rectangular blocks act as solid walls in the middle, and colored ring holes are the exits. A couple of black holes with colored frames are “warning” holes you must avoid sending the wrong gecko into.
Timer, Drag Paths, and Pressure
The win condition in Gecko Out 472 is simple on paper: drag each gecko’s head so its body follows a path into the hole that matches its color, without hitting walls, other geckos, or locked/frozen exits. Once every gecko is in the right hole before the timer hits zero, you’re done.
The challenge is that:
- The timer is strict, so you don’t have time to experiment with huge looping paths.
- Movement is path-based, so every squiggle you draw makes the body trace that exact route; if you draw big, messy curves, you’ll block corridors for later geckos.
- The “3” and “12” frozen blocks only clear after enough moves/time, so you have to plan around temporarily blocked exits and tunnels.
Gecko Out Level 472 is really about carving clean, compact paths that open the board instead of tightening the knot.
Pathing Bottlenecks and Logical Traps in Gecko Out Level 472
The Central Bottleneck Corridor
The single biggest bottleneck in Gecko Out Level 472 is the central corridor created by the two brown geckos plus the tall orange–green gecko on the right. Together they form a zigzag channel between the top and bottom halves of the board.
Until you move at least one brown gecko and slightly shift the orange–green one, the board is effectively split:
- Top: purple and blue–green geckos plus several exits.
- Bottom: red–blue, light-blue, orange–green tails, and the pink gecko.
If you rush to clear a bottom gecko first and drag through the middle in a sloppy way, their body will often freeze into a shape that permanently blocks that corridor for everyone else. So the whole level revolves around preserving and widening that central lane.
Subtle Problem Spots to Watch
There are a few non-obvious traps in Gecko Out 472:
- The blue–green gecko near the “3” block: dragging it too early into a cramped loop can block both the nearby blue exit and the upper-right black warning hole, making it impossible to snake later geckos through cleanly.
- The pink gecko in the lower middle: it looks easy to exit, but if you send it straight into its purple hole without thinking, its body often locks against the brown gecko and white block, closing one of the only smooth paths upward.
- The red–blue gecko at the bottom-left: its length makes it tempting to take a long scenic path to its red exit. If you do, its tail tends to coil across the lower corridor and interfere with the small light-blue gecko reaching the yellow exit and central tunnels.
These aren’t obvious “you lose instantly” mistakes; they’re the kind of missteps that you only realize were bad when your last gecko has no clean route.
When the Level Finally Clicks
I’ll be honest: Gecko Out Level 472 looks like a mess the first few tries. I kept clearing an easy gecko, feeling clever for five seconds, and then hitting a dead board where one long body pinned everything.
The moment it started to make sense was when I stopped thinking “How do I get this one gecko out?” and started asking “If I move this gecko now, what corridors will its body occupy?” As soon as I prioritized keeping the central lane relatively straight and hugged long geckos to the outer walls, the whole level opened up. After that, Gecko Out 472 went from chaotic to almost mechanical: same order, similar paths, reliable win.
Turn-by-Turn Path Strategy to Beat Gecko Out Level 472
Opening: Create Space Without Jamming Lanes
In Gecko Out 472, your first job is to open space around the bottom and center while keeping the middle corridor clean.
A solid opening sequence:
- Nudge the short light-blue gecko near the “12” block. Give it a small, tight path that tucks it closer to the yellow exit but doesn’t actually exit yet. The goal is to clear a bit of room around the frozen block and bucket, not to finish it.
- Shift the red–blue gecko upward along the left side. Drag its head up and around the bucket so the body ends up hugging the left wall, pointing toward its red exit but not fully committed yet. Keep its path as straight and minimal as you can.
- Adjust the lower brown gecko. Move it in a short curve that pulls its tail off the central lane and closer to the lower-left area. Again, think “compact” — you just want the center slightly clearer.
After these small moves, you should see:
- More breathing room around the frozen “12” block.
- The central corridor a little less clogged by brown segments.
- Both bottom geckos positioned so they can exit later without needing huge loops.
Mid-game: Preserve the Central Lane and Free the Top
Now you can start dealing with the mid-board geckos and the upper section in Gecko Out Level 472.
- Exit the pink gecko carefully. Draw a short, efficient path from its head into the nearby purple hole that curves along an existing wall or brown body, not across open central tiles. You want its final body line to act like an extra wall, not a barricade in the corridor.
- Re-position the tall orange–green gecko. Slide its head up/down the right edge so most of its length hugs the border. If you can, leave a clean vertical track in the middle-right column. That way, other geckos can later pass by without zigzagging.
- Use quick moves to thaw the “3” block. Shift the blue–green gecko in the upper-right with small adjustments, circling its body around the ice until the “3” unlocks. Don’t snake wild paths; keep it wrapped tight to its corner so it doesn’t intrude into the central lane.
Once that top-right frozen block opens, the blue exit and nearby passages become accessible, and the top half is much more flexible.
- Exit the purple gecko in the top-left. Pull its head gently down and over into its matching hole, making a short L-shaped path that ends flush with the top wall. You don’t want its final body stretching horizontally across the board.
At this point, several geckos are out, and the layout should feel dramatically more open.
End-game: Final Exit Order and Time Management
The end-game for Gecko Out Level 472 is about finishing in a clean order without closing the final routes:
- Clear the blue–green (upper-right) gecko. With the “3” block gone, drag it directly into its blue exit using as straight a route as possible along the right wall.
- Send the red–blue gecko into its red exit. Because you parked it along the left edge earlier, you should be able to draw a quick hook over into the red ring without crossing the central tiles.
- Exit the light-blue gecko and open around the “12” block. By now you’ve made enough moves that the “12” block is thawing or gone. Draw a small curve into the yellow exit; avoid swinging out into the middle.
- Finish with any remaining brown and orange–green geckos. Use the central lane you’ve protected to route them into their color-matched holes. Keep their heads close to walls, and avoid last-second zigzags that might trap one remaining gecko behind a thick body.
If you’re low on time nearing the last two geckos, prioritize whichever has the longest body in the central area; long bodies take more dragging and are more likely to block others.
Why This Path Order Works in Gecko Out Level 472
Using Pathing and Body-Follow Rules to Untangle
The plan for Gecko Out 472 works because it respects how bodies follow heads:
- Long geckos are always dragged along borders or already-occupied edges so they “trace” the edge of the board instead of drawing new walls in the middle.
- Early moves are tiny nudges, not full exits, which means you get positional advantages without committing a body to a bad lane.
- You thaw frozen blocks (3 and 12) via quick, tight loops so their unlocking doesn’t cost you central space.
You’re basically treating each body like a future wall and choosing where those walls will sit by the end of the level.
Managing the Timer: When to Think vs. When to Move
For Gecko Out Level 472, I like this rhythm:
- Before touching anything, spend a few seconds scanning paths and imagining where long bodies will lie once they exit.
- During the opening and mid-game, make deliberate, short moves; this is where a bad squiggle can ruin the run.
- Once the top is mostly cleared and the “3” block is gone, speed up. The remaining routes are simpler if you followed the plan, so you can drag more confidently and rely on muscle memory.
If you find you’re always timing out, practice the same order a few times. The timer feels much more forgiving once the move sequence is familiar.
Boosters: Optional, Not Required
For Gecko Out 472, boosters are helpful but absolutely optional:
- An extra-time booster is nice if you’re still learning the route, but you don’t need it once you’re consistent.
- A hammer-style tool to crack one frozen block (usually the “12” near the bottom) can trivialize the end-game, but it’s overkill; the natural move count will thaw it in time.
- Hints can show you a rough path, but they rarely teach you the corridor-preserving logic, so treat them as a backup if you’re completely stuck, not as your default.
Mistakes, Fixes, and Logic You Can Reuse in Other Gecko Out Levels
Common Errors on Gecko Out Level 472
Here are frequent mistakes players make on Gecko Out 472 and how to fix them:
- Exiting the easiest gecko first. Fix: Always think about corridor control; sometimes the “easy” exit creates the worst wall.
- Drawing big loopy paths. Fix: Keep every route as short and straight as possible, especially for long geckos.
- Ignoring frozen blocks. Fix: Plan early quick moves near the “3” and “12” ice so they thaw naturally while you’re solving other parts.
- Parking bodies in the central lane. Fix: Hug edges and white blocks; treat the center like a shared highway that must stay open.
- Panicking near the timer end. Fix: Commit to a repeatable order; when your hands know what to do, you don’t burn time thinking.
Reusing This Logic on Other Knot-Heavy Levels
The strategy you learn from Gecko Out Level 472 translates well to other tricky stages:
- On gang-gecko levels, treat linked geckos like one giant snake and park them along the same borders.
- On frozen-exit stages, always work “around” the ice with small nudges instead of forcing long paths through crowded areas.
- On any knot-heavy board, identify the main corridor first, then plan how to exit geckos while keeping that corridor as straight and clean as possible.
Once you start seeing bodies as future walls, harder Gecko Out levels suddenly feel a lot more predictable.
Gecko Out Level 472 Is Tough, But Beatable
Gecko Out Level 472 looks chaotic, and the timer adds stress, but it’s completely beatable once you focus on lane management instead of individual exits. Take a moment to read the board, follow the opening nudges, keep your paths tight, and you’ll feel the level “unlock” run by run. Stick with this plan and you’ll clear Gecko Out 472 without needing to lean on boosters.

