Gecko Out Level 170 Solution Walkthrough | Gecko Out 170 Answer
How to solve Gecko Out level 170? Get step by step solution & cheat for Gecko Out level 170. Solve Gecko Out 170 easily with the answers & video walkthrough.


Gecko Out Level 170: Board Layout, Rules, and Win Condition
The Starting Board: Packed Center, Multi-Color Geckos, and Tricky Exits
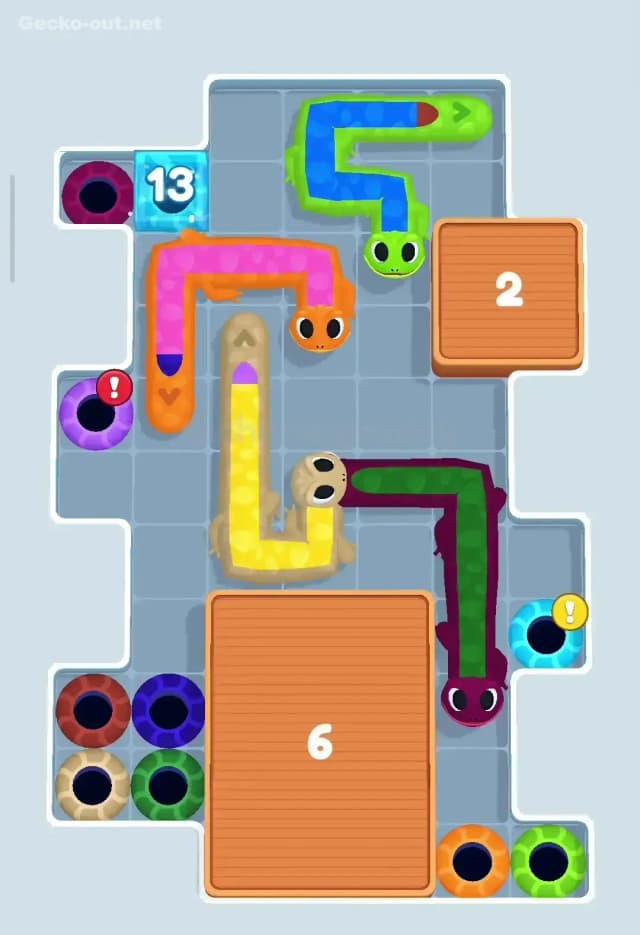
In Gecko Out Level 170 you’re thrown onto a tall, narrow board with four geckos and barely any free tiles. Two big wooden blocks (marked 2 near the top-right and 6 in the lower-middle) squeeze the play area into tight corridors. Most of the puzzle happens in that central column between the two blocks, where several geckos are already snaked around each other.
You’ve got a mix of “normal” and gang-style geckos.
- The beige/yellow gecko sits in the middle column, running vertically then turning under the
2block. - An orange-headed gecko with a pink body wraps around the left side of the
2block. - On the right side, a long purple-and-green gecko hugs the wall from top to bottom.
- Above that, a multi-color gang gecko (green head with blue and red segments) curls in the tight space above and beside the
2block.
All their exits are packed into the edges: a stack of four colored holes at the bottom-left, single exits on the mid-left and mid-right, and another exit on the bottom-right. On top of that, there’s a frozen exit in the upper-left corner with a countdown (13), plus exclamation-mark “warning” exits on the mid-left and mid-right that only accept one specific segment. You’re basically playing gecko Tetris under pressure.
Win Condition, Timer, and Why Pathing Matters So Much
As always in Gecko Out 170, every gecko has to slither into a hole of its matching color to clear the level. Gang geckos complicate this: each colored segment of the same body must line up with its own matching exit, so the path you draw with the head has to drag each segment over the right hole in the right order. There’s no overlapping, no crossing through walls, and no slipping through icy or locked exits until they’re ready.
The timer makes Gecko Out Level 170 feel way tighter than it looks. You don’t have time to “sketch” long, loopy routes just to see what happens. Every extra zig-zag means extra body travel, which burns seconds. Because each gecko’s body perfectly traces your drag path, a bad line doesn’t just waste time—it can knot the board, wrap around exits you still need, or block the only corridor another gecko can use. The level is won or lost on efficient, corridor-friendly paths.
Pathing Bottlenecks and Logical Traps in Gecko Out Level 170
The Main Bottleneck: The Central Vertical Corridor
The single biggest choke point in Gecko Out 170 is the narrow vertical lane between the 2 and 6 blocks. Three different geckos either sit in that lane or must pass through it to reach their exits. If you park a long body there, you’ve basically sealed half the board.
Your first big mental rule for this level: never leave a gecko “parked” in the middle of that column. Use it as a short-term highway, then move that gecko to a side wall or bottom corner so others can use the same space later.
Subtle Problem Spots You Probably Underestimate
First, the bottom-left cluster of four holes is a trap disguised as freedom. It looks like a wide-open sink for several geckos, but if you send one gecko in on a messy path, it will snake around the entire area and box out the remaining colors. You want clean, almost straight lines into that cluster.
Second, the warning holes on the mid-left and mid-right edges are easy to misuse. Only one specific segment is allowed in each; if another gecko’s body passes through, you soft-lock the level and don’t even realize it until late. I learned to mentally “red flag” those tiles and only approach them when I’m actually ready to score that segment.
Third, the frozen exit with the 13 counter in the upper-left corner sounds optional, but it subtly affects your timing. If you rush a segment there before it thaws or waste moves dancing around it, you lose precious seconds and scramble the board for no gain.
When Gecko Out 170 Finally Starts Making Sense
The first few attempts, I kept feeling like I was doing “almost” the right thing and still running out of space. The turning point was realizing that Gecko Out Level 170 isn’t about solving each gecko independently; it’s about staging. You temporarily park bodies along the outer walls and the underside of the 6 block, then revisit them once the center is clear.
Once I committed to using the edges as parking lanes and treating the central column like a shared highway, the layout stopped feeling chaotic. Suddenly I could see a logical exit order and how each move opened space for the next gecko instead of closing doors behind me.
Turn-by-Turn Path Strategy to Beat Gecko Out Level 170
Opening: Free the Center and Park on the Edges
Start by slightly nudging the right-side purple/green gecko upward, then curling it along the right wall so its body runs beside the 6 block rather than blocking the central column. The goal isn’t to exit it yet; you’re just pinning it to the wall so the middle lane opens.
Next, take the beige/yellow gecko in the central column. Drag its head downward and around the left side of the 6 block, hugging the wall. Park its head near the bottom-left area without dropping into a hole yet. This shape clears the center and gives you a neat route later straight into its matching beige exit.
Now you can gently unwrap the orange/pink gecko around the 2 block. Pull its head rightward, then down along the front of the 2 block into the central lane. Park it temporarily along the underside of 2 or on the left edge, keeping that main vertical corridor as straight and open as possible.
Mid-game: Keep Lanes Open and Route Gang Segments Cleanly
With the center fairly clear, it’s time to start scoring clean exits.
-
Send the beige/yellow gecko into its bottom-left exit with a short, direct line. Avoid looping around the other holes; just dip into the correct color and stop. This removes a long body from the board and gives more breathing room near the
6block. -
Use the freed space to route the orange/pink gecko: first guide it toward its special mid-left exit or colored hole (depending on the color layout in your run), then continue its path down to its final bottom or side exit. Remember: one continuous path can pass across multiple correct exits for different segments, so plan a single smooth “S” that touches each right hole once.
-
With those two largely out of the way, focus on the multi-color gang gecko near the
2block. Pull its head down into the central lane, then sweep it in a tight arc toward the bottom-left cluster. Your priority is to keep the line snug against the blocks so you don’t flood the middle of the board with extra body.
Each time you pull a gang gecko head past a matching hole, pause mentally and make sure that segment will land exactly on it—no overshooting, no wrapping all the way around the cluster. Clean, one-pass paths make Gecko Out Level 170 much easier.
End-game: Final Exit Order and Low-Time Tactics
By now, you should have only one major gecko left: the tall purple/green gecko on the right, plus possibly one last segment that needs the thawed top-left exit.
Finish by:
-
Guiding the purple/green gecko from its parking spot along the right wall into its correct mid-right or bottom-right exit. Keep its path strictly against the right edge to avoid re-blocking the center.
-
If you still need to use the frozen top-left exit, route the remaining segment now, when the ice is thawed and the board is uncluttered. Drag the head in a quick, almost straight path along the top edge and then down into the exit.
If you’re low on time, don’t panic and redraw long paths. Use short, direct routes that reuse already-cleared corridors. Remember: the body retraces everything you drew, so the shortest visible line is always the fastest option.
Why This Path Order Works in Gecko Out Level 170
Using Pathing and Body-Follow Logic to Untangle the Knot
This plan works in Gecko Out 170 because you’re always thinking about where the bodies will end up, not just where the heads go. Parking geckos along the left and right walls and the underside of the 6 block keeps the central highway empty. Once a gecko is “pinned” to a wall, moving other heads through the middle doesn’t add new crossings or knots.
Routing gang geckos late, after one or two long bodies are gone, means the multi-color segments have free access to their specific holes. You’re effectively untangling the knot by peeling away layers in a controlled order.
Timer Management: When to Think and When to Move
For Gecko Out Level 170, I like a two-phase mindset. At the start, I take a few seconds to read the board and plan the first two or three moves: which gecko to park where, and which exits must stay free. That thinking time up front prevents messy redraws later.
Once the center is clear and I’ve committed to my exit order, I move fast. No paused drags, no experimental loops—just confident, straight-ish lines. If you notice yourself “scribbling” paths, stop, undo, and re-drag a shorter version. You’ll gain more time by simplifying lines than by rushing bad ones.
Are Boosters Needed for Gecko Out Level 170?
Boosters are optional here. You shouldn’t need a hammer or freeze-breaker if you respect the frozen exit and save it for last. A time booster can help if you’re consistently finishing with one gecko left; in that case, use the extra-time booster at the very start so you don’t feel rushed while planning your parking spots.
I’d only recommend a destructive booster (like breaking a block) if you’ve tried the central-highway strategy several times and still struggle. In normal play, Gecko Out Level 170 is absolutely doable without spending any power-ups.
Mistakes, Fixes, and Logic You Can Reuse in Other Gecko Out Levels
Common Mistakes on Gecko Out 170 (and How to Fix Them)
- Parking a gecko in the central column so no one else can pass. Fix: always move long bodies to hug the walls or underside of a block when you’re done with them.
- Filling the bottom-left hole cluster with a messy route that wraps around the whole pocket. Fix: send each gecko in with a sharp, controlled line that touches only its target hole.
- Accidentally sending the wrong gecko over a warning exit. Fix: mentally mark those tiles as “off-limits” until you’re doing the specific segment that needs them.
- Trying to solve each gecko separately instead of staging. Fix: think in terms of phases—open the center, park on edges, then process exits in a chosen order.
- Wasting time with long experimental paths. Fix: pause, plan a short, clean route, then drag once with confidence.
Reusing This Logic on Other Knot-Heavy Levels
The core ideas from Gecko Out Level 170 carry straight into other hard stages: treat the board like shared infrastructure. Corridors are highways, walls are parking lanes, and big blocks are natural dividers for staging areas. With gang geckos, always plan a continuous route that passes each matching exit once, rather than making multiple chaotic trips.
On frozen-exit levels, don’t chase the iced hole early. Use your time to clear other geckos and set up easy access for later. The same “phase” approach—clear, park, then score—will keep a lot of seemingly impossible layouts under control.
Final Thoughts: Tough but Totally Beatable
Gecko Out Level 170 looks brutal the first time you see all those long geckos woven together, but once you treat the central lane as a shared highway and commit to clean, wall-hugging paths, it clicks. You don’t need perfect reflexes or boosters—you just need a clear exit order and the discipline not to clog the middle. Stick to the plan, keep your routes short, and Gecko Out 170 turns from a panic-inducing knot into a very satisfying untangle.