Gecko Out Level 175 Solution Walkthrough | Gecko Out 175 Answer
How to solve Gecko Out level 175? Get step by step solution & cheat for Gecko Out level 175. Solve Gecko Out 175 easily with the answers & video walkthrough.


Gecko Out Level 175: Board Layout, Rules, and Win Condition
Reading the Starting Board
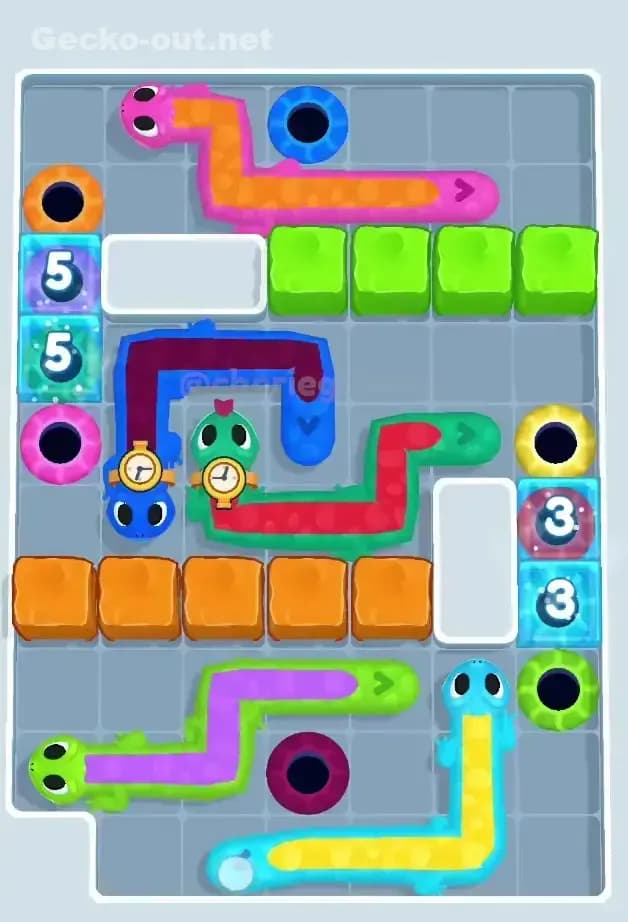
Gecko Out Level 175 drops you into a very cramped grid with almost no open floor. You’ve got a mix of single geckos and “gang” geckos (two heads sharing one body), plus a forest of numbered stone blocks that work as permanent walls. You can’t cross those blocks, so they funnel you into a few tight corridors.
Key things you’ll see when you first load Gecko Out 175:
- A dense wall of
8blocks on the upper‑left and10blocks on the upper‑right, forming a U‑shaped cage around the top. - Multiple exits (colored holes) along the top and middle rows. A few have exclamation marks — those “warning holes” act like blocked tiles for this level, so you must route around them.
- A big purple gecko occupying the center lanes, essentially sitting on the crossroads of the whole board.
- A tan/blue gang gecko near the lower middle forming a U‑shape around a red exit.
- A very long brown gecko stretched across the bottom row, plus several short geckos (green, pink, orange, yellow, etc.) tangled along the left side.
Everything is already intertwined, so every move you make either frees the grid or tightens the knot.
Win Condition And Why The Timer Hurts
The basic win condition in Gecko Out Level 175 is the same: drag each gecko head so its body slithers along your path and ends in a hole of the same color. You fail if:
- Any gecko tries to cross a wall, another gecko, or a blocked/warning hole.
- The timer runs out before every gecko reaches its safe exit.
Because movement is path‑based, the body perfectly traces your drag. That means if you lazily draw a big, wiggly route “just to move something,” you’re actually filling the map with gecko body and making later paths impossible.
In Gecko Out 175 the strict timer and cramped layout work together: you don’t have time to slowly experiment with ten different routes. You need a short planning pause, then confident, efficient drags that create space for the remaining geckos.
Pathing Bottlenecks and Logical Traps in Gecko Out Level 175
The Main Bottleneck: Central Crossroads
The single biggest bottleneck in Gecko Out 175 is the central crossroads where the large purple gecko, the tan/blue gang gecko, and several exits all overlap.
- The purple gecko controls the main vertical lane from the middle down to the lower area.
- The tan/blue gang gecko wraps horizontally just beneath it, blocking easy access between the left cluster and the right exits.
- Several exits sit just above and around these bodies, so any sloppy path risks cutting off someone else’s route later.
If you move the purple gecko without thinking, you’ll often end up with its body drawn right through spaces that another color still needs. The level is basically asking: “Can you clear the smaller, outer geckos while keeping this crossroads usable for the big guys?”
Subtle Problem Spots To Watch
There are a few less obvious traps:
-
Warning holes with exclamation marks
They’re easy to forget in a hurry, but they act like extra walls. Routing too close to them can leave you with only one tight tile to squeeze through. -
The bottom-left cluster (green/pink/orange vs. brown)
The short geckos here look easy, but the long brown gecko wants to use that same lane later. If you park finished bodies in the wrong place, you’ll block the brown gecko’s eventual path. -
The gang geckos
Shared bodies mean the route you draw for one head becomes the final body path for both. If you don’t visualize both exits before drawing, you can send the first head home perfectly and still make the second one literally impossible.
When The Level Starts To Click
I’ll be honest: the first few runs of Gecko Out Level 175 feel like all chaos and no logic. I kept solving a couple of easy exits, then suddenly discovering my purple or brown gecko had no legal route left.
The “aha” moment came when I stopped trying to finish geckos as fast as possible and instead focused on who needs shared corridors later. Once I committed to keeping the central crossroads and the bottom lane clean until the end, the whole solution turned into a neat sequence instead of a scramble.
Turn-by-Turn Path Strategy to Beat Gecko Out Level 175
Opening: Free Space On The Left And Bottom
In the opening of Gecko Out 175, your goal is to carve out working space without blocking future highways.
-
Clear the small left-side geckos first
- Route the small green and pink/orange geckos on the left to their nearby exits with tight, efficient paths hugging the left wall.
- When you finish them, keep their bodies tucked along the edges, not sprawled into the central lanes.
-
Do NOT move the long brown or big purple gecko yet
Use them as “walls you control later.” Their current positions still leave enough lanes to work around, and they’re vital for reaching exits in the mid and late game. -
Open up the lower-middle by partly repositioning the tan/blue gang gecko
Don’t finish it yet; just drag its head a bit to straighten the body and clear awkward bends. Park it so the U‑shape doesn’t sit directly under the purple gecko, giving you a little horizontal lane to work through.
After these moves, the left side and lower-middle should feel much less claustrophobic, and you’ll have clear views of where each remaining exit sits.
Mid-game: Protect The Crossroads And Set Up Exits
In mid‑game, Gecko Out Level 175 is all about organizing traffic:
-
Solve the central shorter geckos (like yellow/light blue) whose exits are near the top/mid
- Use quick, direct paths that go around the stone blocks, not through the central vertical lane that purple will need later.
- Think “one bend if possible, two bends max.”
-
Commit to a shared route for the tan/blue gang gecko
- Look at both of their exits first. Plan a single body path that passes by exit A, then continues naturally toward exit B.
- Drag the first head along that future route and drop it straight into its exit. When you drag the second head, follow the same path and peel off at the right moment.
-
Keep the central vertical lane partially empty
- Anytime you move something through the middle, visualize where purple and brown still need to pass.
- If you have a choice between drawing through the very center or skirting along a wall, always hug the wall.
By the end of this stage you should have only the longest or most central geckos left: purple, brown, and often one or two top‑side geckos with bonus clocks.
End-game: Controlled Exits Under Time Pressure
End‑game in Gecko Out 175 is where the timer really bites, but if you’ve preserved lanes it’s actually straightforward.
-
Use the clock-geckos at the top in the late mid‑game or early end‑game
- Send them to their exits once the route is clear but while you still have a bit of time.
- Their extra seconds give you the breathing room to handle the last two snakes calmly instead of panicking.
-
Exit the purple gecko second-to-last
- Plan a vertical/hook-shaped path that uses the central lane but doesn’t wrap excessively around the board.
- Make sure the route you draw still leaves the bottom row or a side corridor open for the brown gecko’s final path.
-
Finish with the long brown gecko
- Now the bottom and central lanes should be mostly empty. Draw a smooth, almost straight line from brown’s head to its exit, taking the shortest turn that avoids remaining bodies and warning holes.
- Because the route is simple, you can draw it very quickly if the timer is low.
If you reach the last two geckos with at least a few seconds plus a clock bonus left, you’re in great shape to close out Gecko Out Level 175.
Why This Path Order Works in Gecko Out Level 175
Using Head-Drag Logic To Untangle, Not Tighten
The core trick of Gecko Out 175 is that each route becomes permanent body. This plan:
- Clears peripheral, easy geckos first, so finished bodies sit along walls instead of in shared corridors.
- Delays the largest geckos (purple, brown) until their paths are obvious and unobstructed, so they don’t become accidental roadblocks.
- Handles gang geckos only once you’ve visualized both exits, so the shared body works for both heads.
You’re always turning temporary chaos into structured lanes, one gecko at a time.
Timer Management: When To Think vs. When To Move
What worked best for me in Gecko Out Level 175:
- Spend the first 3–5 seconds just reading the board and mentally choosing an order. Don’t drag anything yet.
- During the opening and mid‑game, move carefully but decisively. Redrawing paths wastes both time and space.
- In the last three geckos, stop over‑planning and just execute the routes you already visualized. Straight, minimal‑bend paths are faster to draw and safer for the timer.
Boosters: Optional, But Here’s How To Use Them
You can absolutely beat Gecko Out 175 without boosters, but they can rescue close attempts:
- Extra time booster: Best used right before you start the purple and brown geckos if you consistently reach that stage with almost no time left.
- Hammer/obstacle remover: If available, using it on one of the low‑number stone blocks near the center or bottom can open a backup lane, but it’s not required.
- Hints: I’d treat hints as a last resort after a few serious attempts; they’re more fun if you use them only to confirm the general order, not to play the level for you.
Mistakes, Fixes, and Logic You Can Reuse in Other Gecko Out Levels
Common Mistakes On Gecko Out Level 175
-
Finishing the big purple or brown gecko too early
- Fix: Treat them as late‑game pieces. Keep their lanes free and only commit once most smaller geckos are gone.
-
Ignoring warning holes and accidentally boxing yourself in
- Fix: Mentally mark every exclamation‑hole as a wall. Don’t plan routes that rely on squeezing through a single tile right beside one.
-
Drawing long, loopy paths “just to move something”
- Fix: Before every drag, ask “What’s the shortest safe line to this exit?” Minimal bends mean more free tiles later.
-
Misusing gang geckos
- Fix: Always plan both heads’ routes before moving the first head. Picture the shared spine of the body and how each head will branch off.
-
Panicking in the final seconds
- Fix: Pre‑visualize the last two or three routes while you’re finishing mid‑game. When the timer turns red, you should be executing, not thinking.
Reusing This Logic On Other Levels
The approach you learn from Gecko Out Level 175 is gold for other tricky stages:
- On any knot-heavy level, identify the one or two “highways” everyone needs and protect them until the end.
- Against gang geckos, always think “shared spine, then branches.” One clean shared path is better than two separate messy paths.
- For tight choke points formed by walls or frozen exits, clear the surrounding small geckos first so finished bodies hug the edges and leave the choke usable.
Once you start seeing each board as a traffic problem instead of a chaos puzzle, you’ll feel way more in control.
Final Encouragement
Gecko Out Level 175 looks brutal at first glance, but it’s absolutely beatable once you respect the central crossroads and plan around the long geckos. Give yourself a few runs just to practice the opening sequence and the gang‑gecko routes, and you’ll suddenly find the end‑game turning from stressful to satisfying. Stick to a clear order, keep your paths tight, and Gecko Out 175 will go from “impossible” to “I can speedrun this” surprisingly fast.