Gecko Out Level 123 Solution Walkthrough | Gecko Out 123 Answer
How to solve Gecko Out level 123? Get step by step solution & cheat for Gecko Out level 123. Solve Gecko Out 123 easily with the answers & video walkthrough.


Gecko Out Level 123: Board Layout, Rules, and Win Condition
How the board is set up
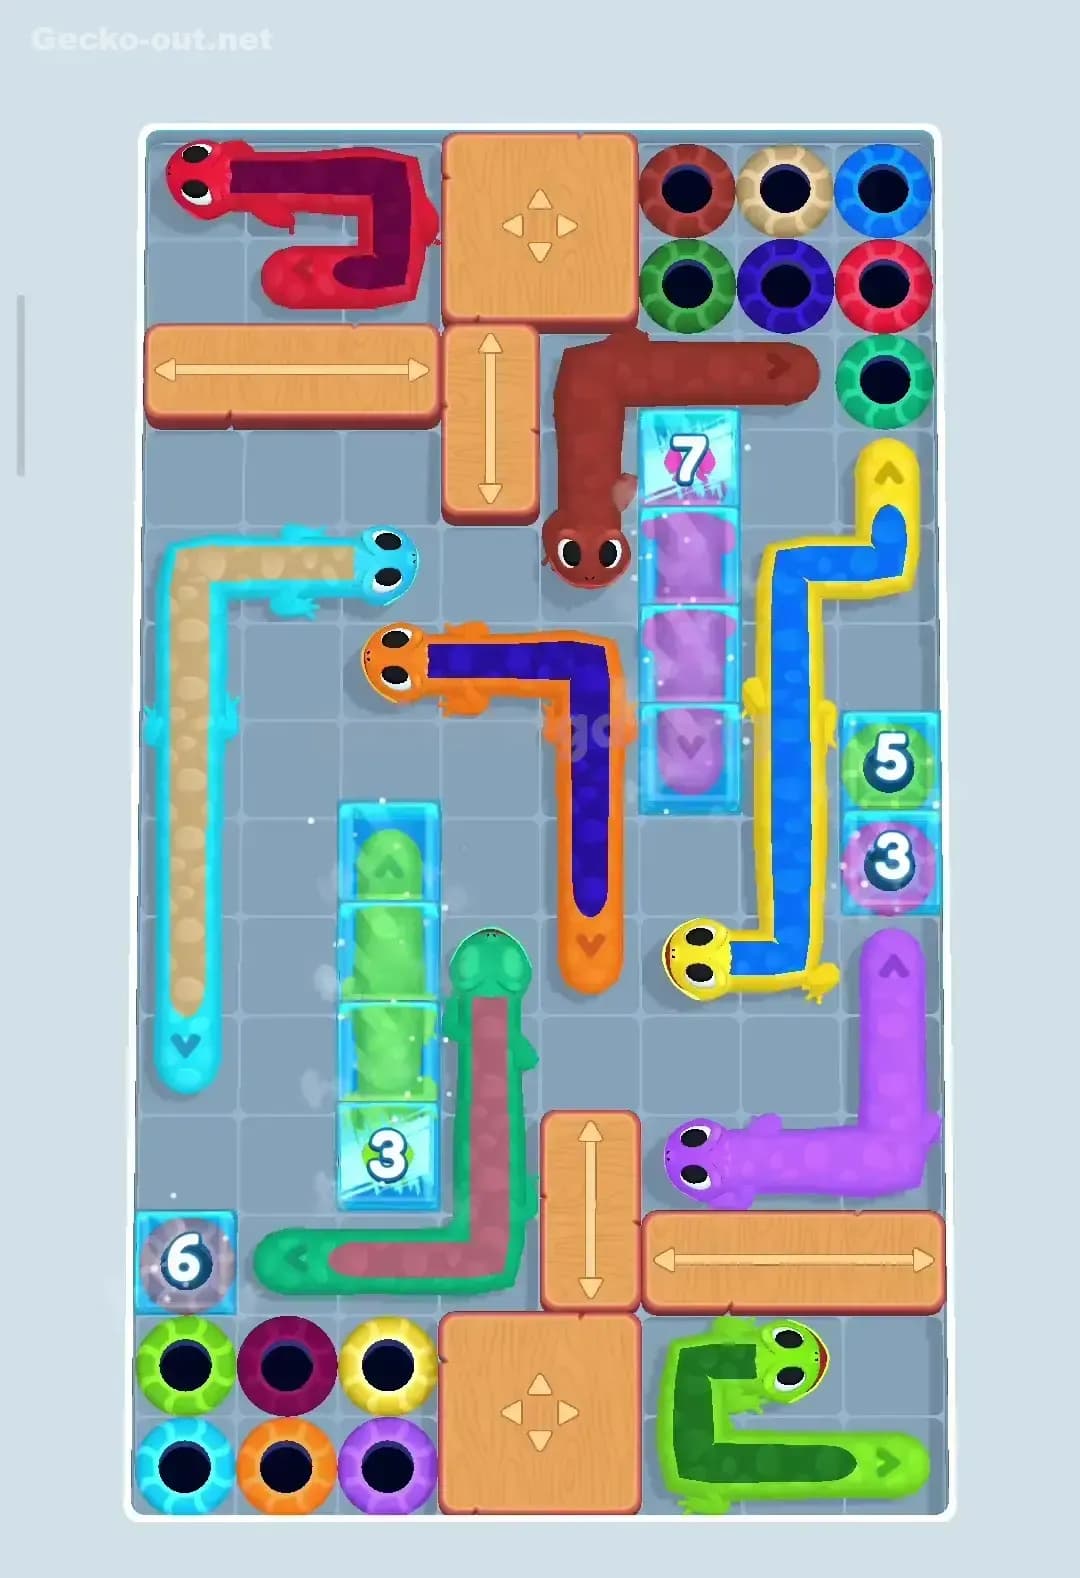
In Gecko Out Level 123 you’re dealing with a tall, two‑section board packed with long geckos and movable wooden blocks. The upper half has three geckos: a long green one stretched along the very top, a cyan/orange gecko hugging the right side, and a purple‑headed gecko whose body loops in a squared “U” on the left. Their exits are mostly in the top‑left cluster of colored holes plus a single cyan hole on the right and a lone purple hole in the middle corridor.
The lower half of Gecko Out 123 is even busier. There’s a yellow/beige L‑shaped gecko sitting around the left‑side exit, a red/blue gecko pinned horizontally on the right, and two L‑shaped geckos at the bottom: a pink/brown one in the bottom‑left corner and a dark purple/blue one on the bottom edge pointing up. Their exits are mainly in the big color cluster at the bottom‑right plus one purple exit on the left.
Between the geckos, you have several wooden blocks with arrows on them that slide to open or close corridors, plus narrow lanes where only one gecko can pass at a time. Grey “1‑2‑3” tiles sit near the middle of each section; they act as a tight stepping strip that many routes must cross. The whole layout of Gecko Out Level 123 is designed so that any rushed move will trap a tail in a corridor you need later.
Win condition and what makes the movement tricky
The win condition in Gecko Out 123 is the usual: you have to drag every gecko’s head so its body slithers into a hole of the same color before the timer hits zero. You fail if even one gecko is still outside when time runs out, or if you ever drag a path that forces a body to collide with a wall, a wooden block, another gecko, or the wrong hole.
Because the body follows the exact path you draw with the head, Gecko Out Level 123 punishes sloppy curves. If you zigzag lazily in the central lanes, you’re not just wasting time; you’re literally weaving a knot that other geckos have to get around later. The strict timer means you can’t redraw endlessly: you’ll spend a few seconds planning, then you need to commit to long, clean paths that both reach the right hole and leave the board open for whoever moves next.
Pathing Bottlenecks and Logical Traps in Gecko Out Level 123
The main bottleneck lane
The single biggest bottleneck in Gecko Out Level 123 is the right‑side corridor that runs through the “1‑2‑3” tiles and past the cyan exit. Both the upper cyan/orange gecko and the lower red/blue gecko rely on that space, and the wooden blocks above and below can easily seal it off. If you park any long body across those tiles, you effectively split the board in two and force yourself into impossible angles later.
That corridor is also where the last few geckos tend to cross: it’s a shared highway between the upper and lower halves of Gecko Out 123. So the whole strategy revolves around deciding who gets to use that lane early, who must wait, and where you temporarily park bodies so they aren’t stretched across it.
Subtle traps that keep causing resets
There are a few less obvious danger spots in Gecko Out Level 123:
- The green gecko along the top can easily be dragged into a position that blocks the top‑left exit cluster. If you curl it downward too early, the purple gecko loses its only clean line to its hole.
- The purple‑headed gecko on the left looks “free,” but if you snake it carelessly, its tail ends up guarding the only opening into the middle purple hole. Later geckos then can’t swing through without a full reset.
- In the lower half, the yellow gecko’s L‑shape is deceptive. If you straighten it toward the center too soon, it blocks both the red/blue gecko and the dark purple gecko from turning toward their bottom‑right exits.
All of these traps come from the same thing: drawing short, greedy paths to finish a single gecko instead of planning where their bodies will sit after they exit.
When the solution started to make sense
For me, Gecko Out 123 felt unfair at first. I kept getting down to two geckos left with plenty of time, only to realize that one tail was lying perfectly across the lane the other needed. After a few fails, the pattern clicked: this level isn’t about “who can reach their color hole fastest,” it’s about “who can temporarily clear space for the big movers.”
The moment Gecko Out Level 123 started to feel solvable was when I treated the first few moves as positioning, not exits. I let myself drag heads in wide arcs along the edges just to park bodies safely, then used that space to route the long geckos through the center. Once I respected that right‑side bottleneck, the whole solution flow fell into place.
Turn-by-Turn Path Strategy to Beat Gecko Out Level 123
Opening: creating space and parking safely
In the opening of Gecko Out Level 123, focus on freeing the top section and stabilizing the lower one.
- First, nudge the upper wooden blocks so the cyan/orange gecko can turn down into its cyan hole on the right without cutting across the entire corridor. Keep the path tight to the right wall; you want its body hugging the edge, not sprawled through the middle.
- With cyan gone, route the long green gecko along the very top and into its green exit in the top‑left cluster. Draw a clean, rectangular path hugging the outer walls so its body vacates the right side and doesn’t sit over the exit cluster.
- Now move the purple‑headed gecko on the upper left. Swing its head around the loop and up into the purple hole that’s closest, again keeping the path hugging borders so the center remains open.
At the same time, don’t touch the lower geckos more than you need to. You can slightly adjust the yellow and pink geckos to hug their walls, “parking” them in tighter L‑shapes, but avoid dragging them into the central lanes yet. Early in Gecko Out Level 123, your only goal is to clear the top half while leaving the right‑side bottleneck empty.
Mid-game: keeping lanes open and moving the long bodies
Once the three top geckos are out, you can deal with the crowded bottom of Gecko Out 123.
- Start with the yellow gecko. Shift the nearby wooden block so it can bend cleanly into its yellow exit on the left side. Draw the path tight around the exit, not through the middle strip of tiles; that keeps the central corridor clear.
- Next, free the red/blue gecko. Slide the central wooden block in the lower half so it opens a straight run through the “1‑2‑3” tiles toward the bottom‑right cluster. Drag the red head in a long, mostly straight line to its red hole, hugging the right wall so the path doesn’t curl back into lanes you’ll need later.
- With red gone, you have room to untangle the pink/brown and dark purple geckos. Park the pink one first: draw its head along the left and bottom walls to compact its body into the bottom‑left corner, away from the right side.
The entire mid‑game in Gecko Out Level 123 is about never drawing a path that drops a body permanently across that middle corridor or the tiles in front of the bottom‑right exits. Every time you move a gecko, check whether its final body position leaves a straight channel for the next one.
End-game: final exit order and dealing with low time
The end‑game of Gecko Out 123 is usually just the two bottom L‑shaped geckos.
- With pink parked tight in the corner, take the dark purple gecko and route it first. Use the space opened by the red/blue gecko to slide its head right and then down into its purple exit in the bottom‑right cluster. Keep the turn wide so its body doesn’t double back into the corridor.
- Finally, draw a simple L‑path for the pink/brown gecko from its corner up and across to its matching brown exit. At this point everything else is gone, so you can be generous with the arc without worrying about blocking anyone.
If you’re low on time in Gecko Out Level 123, don’t panic and start redrawing. Stick with the plan: long, confident drags along walls are faster than micro‑adjusting in the middle. The final two moves are basically straight shots if you preserved the lanes earlier.
Why This Path Order Works in Gecko Out Level 123
Using body-following to untangle rather than knot
The path order above works in Gecko Out Level 123 because it uses the body‑follow rule to your advantage. By clearing the cyan and green geckos first, you remove the long snakes that would otherwise snake across the shared corridor. Keeping paths glued to outer walls means that when the body follows, it ends up outlining the board instead of bisecting it.
When you park pink and yellow in tight shapes before moving red and dark purple, you’re pre‑packing bodies into “safe” zones. That turns the chaotic knot in the center of Gecko Out 123 into a set of edge‑aligned lines that don’t interact. You’re not just avoiding collisions; you’re turning the board into a series of one‑way highways for each remaining gecko.
Managing the timer: when to think vs. when to move
The timer in Gecko Out Level 123 looks scary, but you can afford one slow read at the start. Take a few seconds to trace, with your eyes, the exits for green, cyan, red, and dark purple. Once you see their routes, the rest are short moves.
After that planning moment, commit. Drag each gecko in a single, fluid motion; don’t stop halfway to “fix” the path unless you spot a guaranteed collision. The levels in Gecko Out 123 are tuned so that decisive play is rewarded—even if your path isn’t perfectly optimal, one strong drag is usually faster than three hesitant ones.
Boosters: optional or required?
For Gecko Out Level 123, boosters are very much optional. You can:
- Use a hint once to preview the correct first exit or two if you’re stuck on the opening order.
- Use a time‑extension booster if you’re consistently failing with one gecko left and you know the paths but just move slowly.
But you don’t need a hammer or any destructive tool; nothing here must be broken. Personally I’d save boosters for more chaotic gang‑gecko stages. Gecko Out 123 is tight but fair once you respect the bottlenecks.
Mistakes, Fixes, and Logic You Can Reuse in Other Gecko Out Levels
Common mistakes and how to fix them
Here are the big errors I see (and made myself) in Gecko Out Level 123:
- Moving the bottom geckos first and clogging the right corridor. Fix: always clear cyan and green in the top half before seriously touching red or dark purple.
- Curling green or purple through the middle early. Fix: any time you move a top gecko in Gecko Out 123, hug the outer walls and aim directly for its hole; don’t “park” it in the center.
- Straightening yellow into the middle lane. Fix: bend yellow into its exit with a short, tight path that never crosses the center strip.
- Exiting red/blue with a curvy path. Fix: give red a nearly straight highway to the bottom‑right, so its body doesn’t wind back into shared space.
- Redrawing paths mid‑drag and burning timer. Fix: plan routes mentally first, then commit to one smooth drag per gecko.
If you catch yourself with a tail lying across the “1‑2‑3” tiles, just reset. In Gecko Out Level 123 that almost always means you’ve made the puzzle unsalvageable.
Reusing this logic in similar levels
The habits you build in Gecko Out 123 translate really well to other knot‑heavy Gecko Out levels:
- Identify the main bottleneck lane before moving anything.
- Decide which long geckos must clear that lane first.
- Park short or corner geckos tightly against walls to gain space.
- Draw paths that outline the board rather than slice through the middle.
On gang‑gecko or frozen‑exit levels, the same thinking applies; you just add the constraints of exit order or thawing. Gecko Out Level 123 is great practice for reading a board as a whole system instead of a series of isolated snakes.
Final word: tough but beatable
Gecko Out Level 123 looks brutal when you first see all those long bodies crammed into vertical corridors, but it’s absolutely beatable without luck or boosters. Once you respect the right‑side bottleneck and commit to clearing cyan, green, then red in a clean order, the level stops feeling like chaos and starts feeling like a controlled unwind. Stick to tight wall‑hugging paths, park your early geckos smartly, and you’ll see Gecko Out 123 fall in just a few tries.